 +
+ 
Needle Engine for Blender
Needle Engine for Blender allows you to create highly interactive, flexible and lightweight web applications right inside Blender. Use the powerful tools of Blender to visually setup your 3D scenes, animate and design.
Install the Blender Add-on
In Blender, go to
Edit > Preferences > Add-onsand click the drop down arrow to find theInstall from Diskbutton.Select the downloaded zip file (named
needle-blender-plugin-*.zip) to install it.Search for "Needle" in the Add-ons search bar and make sure
Needle Engine Exporter for Blenderis enabled.

Getting Started
Thank you for using Needle Engine for Blender.
With this add-on you can create highly interactive and optimized WebGL and WebXR experiences inside Blender, that run using Needle Engine and three.js.
You'll be able to sequence animations, easily lightmap your scenes, add interactivity or create your own scripts written in Typescript or Javascript that run on the web.
Matching lighting and environment settings between Blender and Needle Engine. HDRI environment lights are automatically exported, directly from Blender. Once you save, the page is automatically reloaded.
Providing Feedback
Your feedback is invaluable when it comes to deciding which features and workflows we should prioritize. If you have feedback for us (good or bad), please let us know in the forum!
Samples for Blender
First create or open a new blend file that you want to be exported to the web.
Open the Properties window open the scene category. Select a Project Path in the Needle Engine panel. Then click Generate Project. It will automatically install and start the server - once it has finished your browser should open and the threejs scene will load.
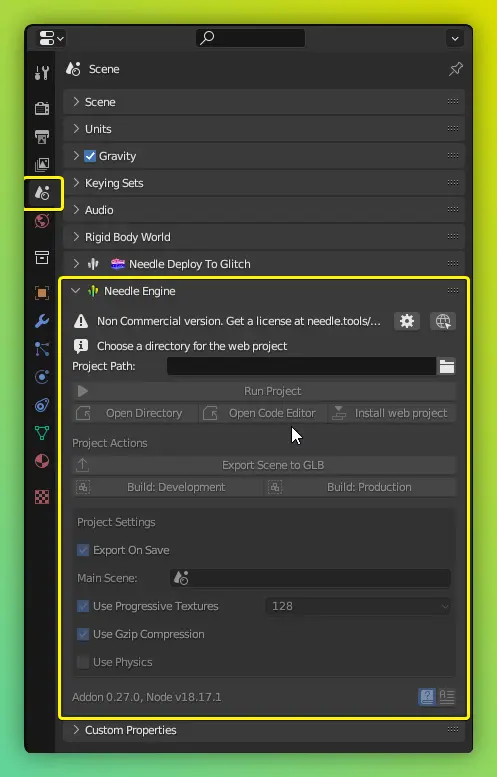
By default your scene will automatically re-exported when you save the blend file.
If the local server is running (e.g. by clicking Run Project) the website will automatically refresh with your changed model.
When your web project already exists and you just want to continue working on the website
click the blue Run Project button to start the local server: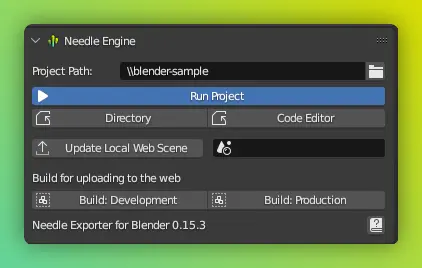
Project Panel overview
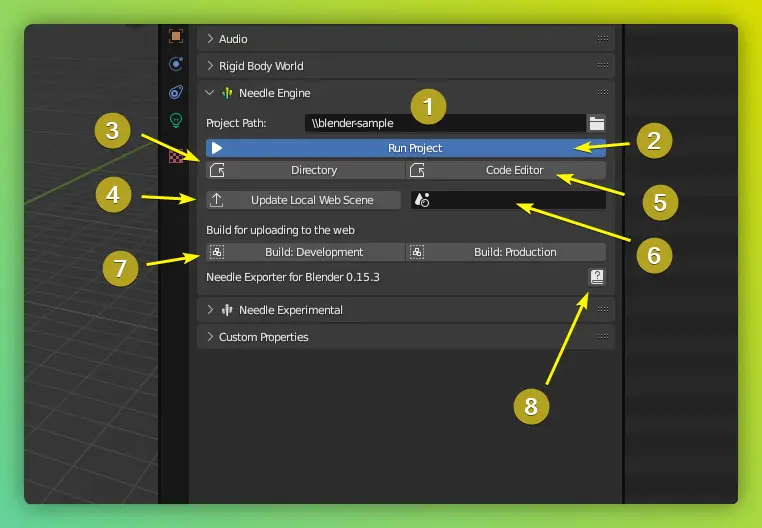
- The path to your web project. You can use the little folder button on the right to select a different path.
- The
Run Projectbutton shows up when the Project path shows to a valid web project. A web project is valid when it contains apackage.json Directoryopen the directory of your web project (theProject Path)- This button re-exports the current scene as a glb to your local web project. This also happens by default when saving your blend file.
Code Editortries to open the vscode workspace in your web project- If you work with multiple scenes in one blend file, you can configure which scene is your Main scene and should be exported to the web. If any of your components references another scene they will also be exported as separate glb files. When clicking the "Export" button, your Main scene will be the one that's loaded in the browser.
- Use the
Build: DevelopmentorBuild: Productionbuttons when you want to upload your web project to a server. This will bundle your web project and produce the files that you can upload. When clickingBuild: Productionit will also apply optimization to your textures (they will be compressed for the web) - Open the documentation
Blender Settings
Color Management
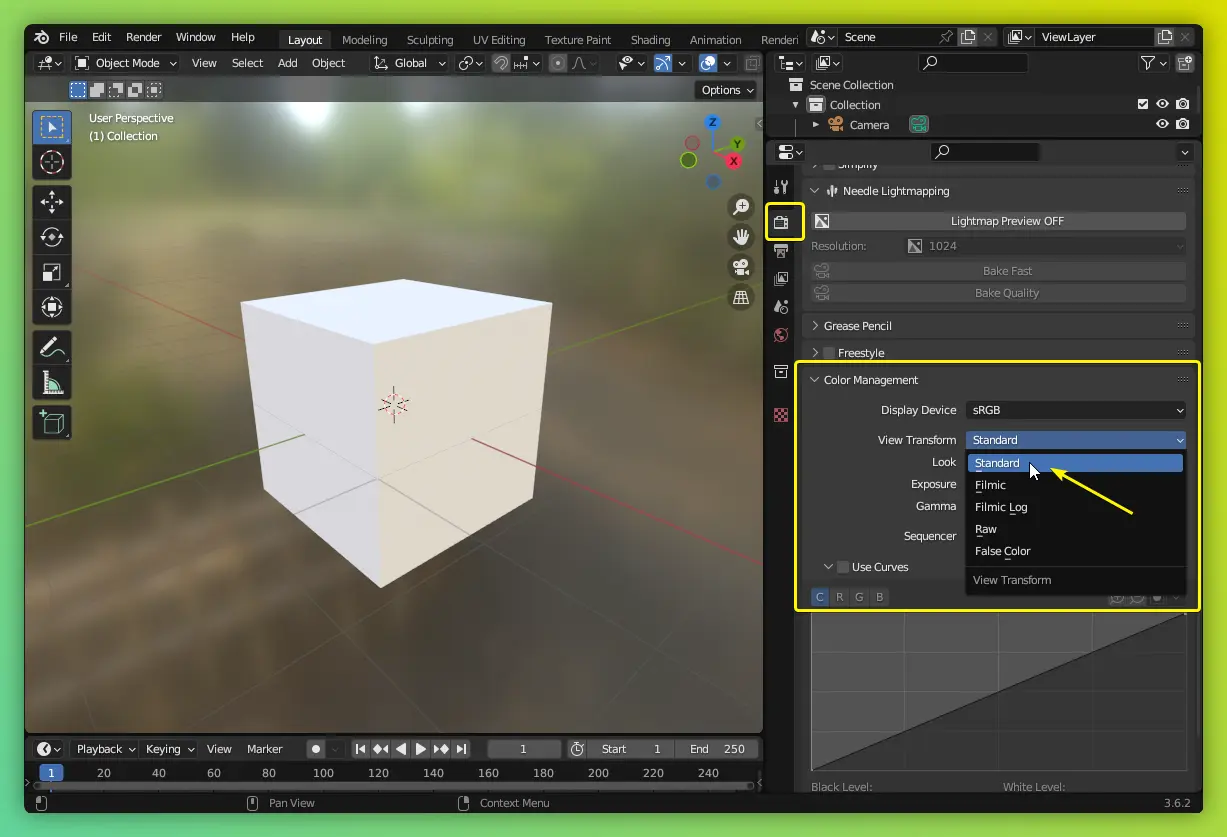
By default the blender viewport is set to Filmic - with this setting your colors in Blender and in three.js will not match. To fix this go to the Blender Render category and in the ColorManagement panel select View Transform: Standard
Environment Lighting
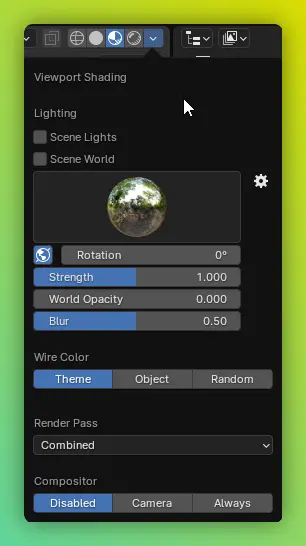
You can change the environment lighting and skybox using the Viewport shading options.
Assign a cubemap to use for lighting or the background skybox. You can adjust the strength or blur to modify the appearance to your liking.
Note: To also see the skybox cubemap in the browser increase the World Opacity to 1.
Note: Alternatively you can enable the Scene World setting in the Viewport Shading tab to use the environment texture assigned in the blender world settings.
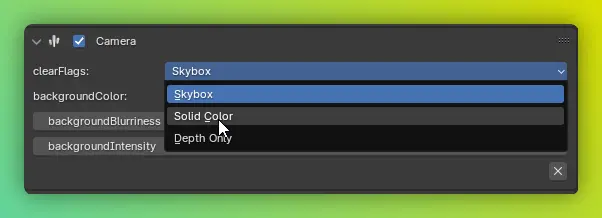
Alternatively if you don't want to see the cubemap as a background add a Camera component to your Blender Camera and change clearFlags: SolidColor - note that the Camera backgroundBlurriness and backgroundIntensity settings override the Viewport shading settings.
Add your custom HDRI / EXR environment lighting and skybox
Export
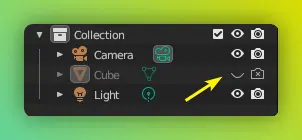
To exclude an object from being exported you can disable the Viewport and the Render display (see image below)
Animation 🏇
For simple usecases you can use the Animation component for playback of one or multiple animationclips.
Just select your object, add an Animation component and assign the clip (you can add additional clips to be exported to the clips array.
By default it will only playback the first clip assigned when playAutomatically is enabled. You can trigger the other clips using a simple custom typescript component)
AnimatorController
The animator controller can be created for more complex scenarios. It works as a statemachine which allows you to create multiple animation states in a graph and configure conditions and interpolation settings for transitioning between those.
Create and export animator statemachines for controlling complex character animations
Creating an AnimatorController
The AnimatorController editor can be opened using the EditorType dropdown in the topleft corner of each panel:

Creating a new animator-controller asset ☝ or select one from your previously created assets
Graph overview
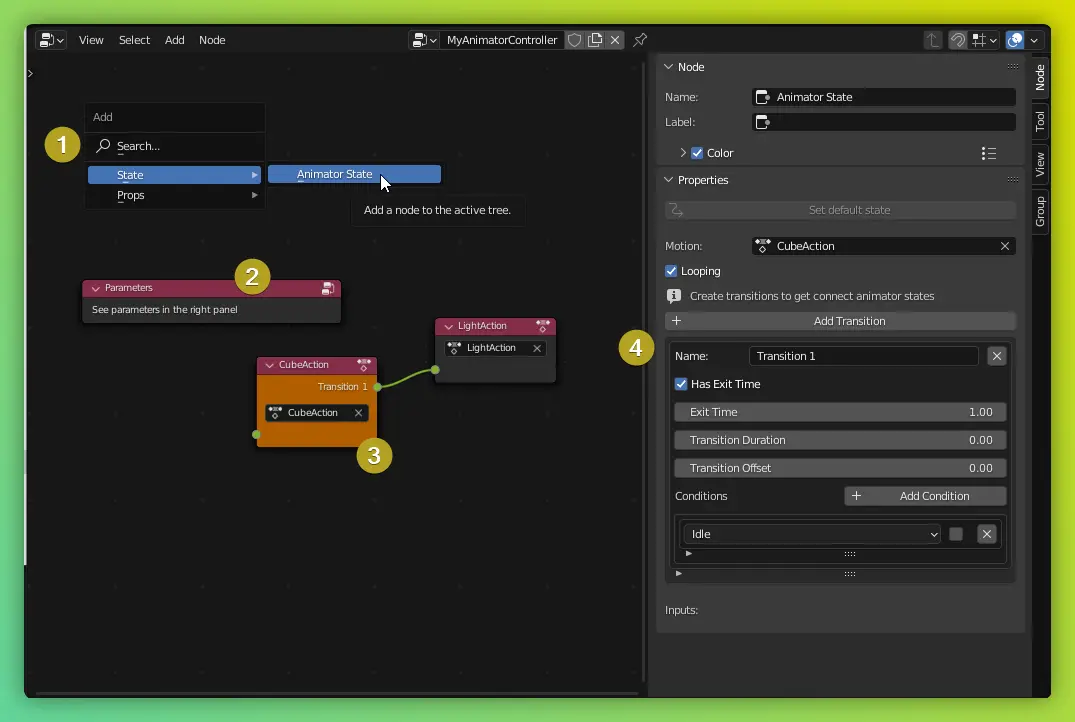
- Use
Shift+Ato create a new AnimatorState - The
Parametersnode will be created once you add a first node. Select it to setup parameters to be used in transitions (via the Node panel on the right border) - This is an AnimatorState. the orange state is the start state (it can be changed using the
Set default statebutton in the Node/Properties panel) - The Properties for an AnimatorState can be used to setup one or multiple transitions to other states. Use the
Conditionsarray to select parameters that must match the condition for doing the transition.
Using an AnimatorController
To use an AnimatorController add an Animator component to the root object of your animations and select the AnimatorController asset that you want to use for this object.

You can set the Animator parameters from typescript or by e.g. using the event of a Button component
Timeline — NLA Tracks export 🎬
You can export Blender NLA tracks directly to the web.
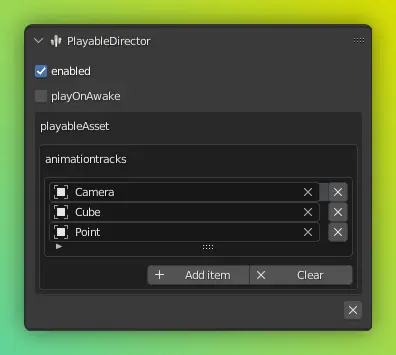
Add a PlayableDirector component (via Add Component) to a any blender object. Assign the objects in the animation tracks list in the component for which you want the NLA tracks to be exported.

Code example for interactive timeline playback
Add this script to src/scripts (see custom components section) and add it to any object in Blender to make a timeline's time be controlled by scrolling in the browsers
import { Behaviour, PlayableDirector, serializable, Mathf } from "@needle-tools/engine";

export class ScrollTimeline extends Behaviour {

    @serializable(PlayableDirector)
    timeline?: PlayableDirector;

    @serializable()
    sensitivity: number = .5;

    @serializable()
    clamp: boolean = false;

    private _targetTime: number = 0;

    awake() {
        this.context.domElement.addEventListener("wheel", this.onWheel);
        if (this.timeline) this.timeline.pause();
    }

    private onWheel = (e: WheelEvent) => {
        if (this.timeline) {
            this._targetTime = this.timeline.time + e.deltaY * 0.01 * this.sensitivity;
            if (this.clamp) this._targetTime = Mathf.clamp(this._targetTime, 0, this.timeline.duration);
        }
    }

    update(): void {
        if (!this.timeline) return;
        const time = Mathf.lerp(this.timeline.time, this._targetTime, this.context.time.deltaTime / .3);
        this.timeline.time = time;
        this.timeline.pause();
        this.timeline.evaluate();
    }
}
Interactivity 😎
You can add or remove components to objects in your hierarchy using the Needle Components panel:
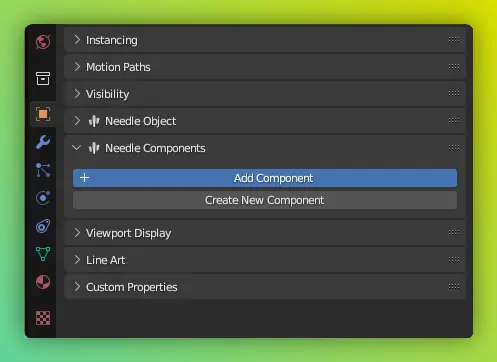

For example by adding an OrbitControls component to the camera object
you get basic camera controls for mobile and desktop devicesAdjust settings for each component in their respective panels
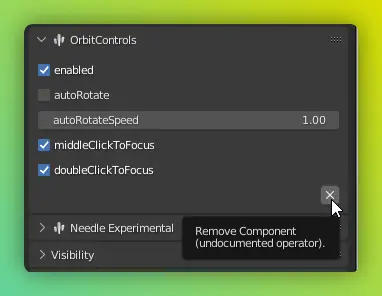
Components can be removed using the X button in the lower right:
Custom Components
Custom components can also be easily added by simply writing Typescript classes. They will automatically compile and show up in Blender when saved.
To create custom components open the workspace via the Needle Project panel and add a .ts script file in src/scripts inside your web project. Please refer to the scripting documentation to learn how to write custom components for Needle Engine.
Note
Make sure @needle-tools/needle-component-compiler 2.x is installed in your web project (package.json devDependencies)
Lightmapping 💡
Needle includes a lightmapping plugin that makes it very easy to bake beautiful lights to textures and bring them to the web. The plugin will automatically generate lightmap UVs for all models marked to be lightmapped, there is no need to make a manual texture atlas. It also supports lightmapping of multiple instances with their own lightmap data. For lightmapping to work, you need at least one light and one object with Lightmapped turned on in the Needle Object panel.
Tips
You can download the .blend file from the video here.
Use the Needle Object panel to enable lightmapping for a mesh object or light:

For quick access to lightmap settings and baking options you can use the scene view panel in the Needle tab:
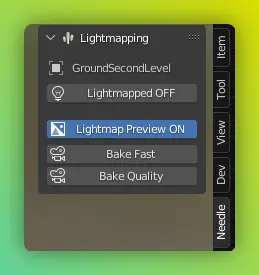
Alternatively you can also use the Lightmapping panel in the Render Properties tab:

Experimental Feature
The lightmapping plugin is experimental. We recommend creating a backup of your .blend file when using it. Please report problems or errors you encounter in our forum 🙏
Texture Compression
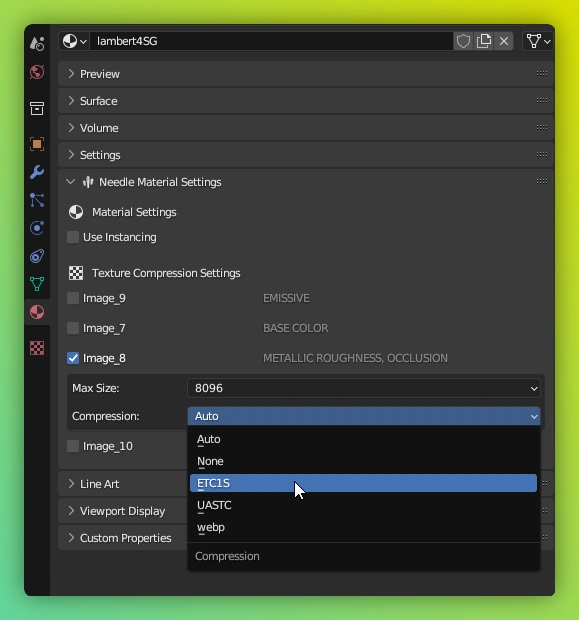
The Needle Engine Build Pipeline automatically compresses textures using ECT1S and UASTC (depending on their usage in materials) when making a production build (requires toktx being installed). But you can override or change the compression type per texture in the Material panel.
You can modify the compression that is being applied per texture. To override the default compression settings go to the Material tab and open the Needle Material Settings. There you will find a toggle to override the texture settings per texture used in your material. See the texture compression table for a brief overview over the differences between each compression algorithm.
Updating
The lightbulb in the Needle Project panel informs you when a new version of the addon is available.
Simply click the icon to download the new version.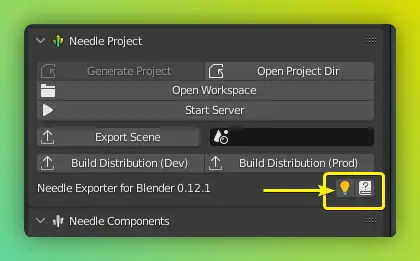
Reporting an issue
If you run into any problems we're more than happy to help! Please join our forum for fast support.
Please also check the logs in Blender. You can find logs specific to the Needle Engine Addon via Help/Needle in Blender.
Integrated Bug Reporter
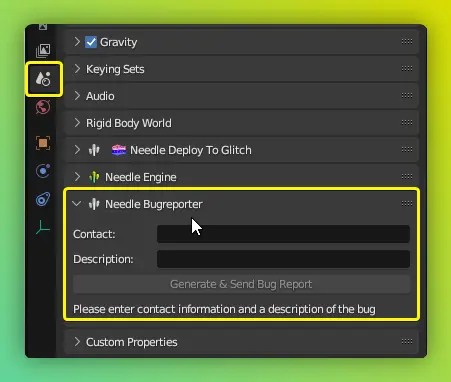
You can also automatically create and upload a bugreport directly from Blender. Uploaded bugreports will solely be used for debugging. They are encrypted on our backend and will be deleted after 30 days.
If needed, in certain cases we're also able to set up custom NDAs for your projects. Please contact us for more information.
Using the Bug Reporter requires a web project
Make sure you've set up a web project before sending a bug report – it will allow us to understand more about your system and setup and make it easier to reproduce the issue.