Licensing
How do I get a license for Needle Engine?
Commercial use of Needle Engine requires a valid license. You can purchase a license on our website: https://needle.tools/pricing.
How can I activate my Needle Engine License?
Activating the license in Unity
Go to Project Settings/Needle and click on the Login button. Follow the steps and log in to your Needle account.
After that, you'll see your account information in the Unity project settings window. Select the licensed team from the dropdown.
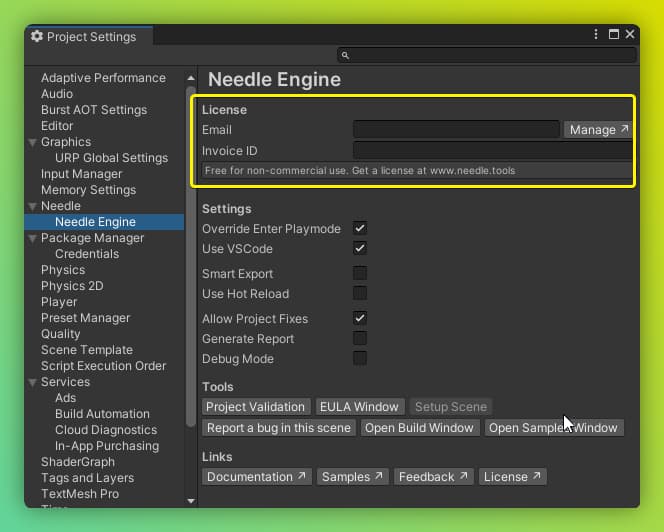
Open Edit/Project Settings/Needle to get the Needle Engine plugin settings. At the top of the window you'll find fields for entering your license information.
Email- Enter the email you purchased the license withInvoice ID- Enter one of the invoice ids that you received by email
Note: You might need to restart the local webserver to apply the license.
Activating the license in Blender
Follow the steps in Install the Add-On, then click the Login button in the Add-on settings and follow the steps to log in to your Needle account.
How do I activate my license in a standalone web project or CI/CD?
If you're working in a standalone web project (not managed by Unity or Blender) or running CI/CD builds, the Needle Engine license needs to be provided through the Needle License Server.
Option 1: Log in locally and select your team
npx needle-cloud loginThis opens a browser window to authenticate with your Needle account. Make sure you select the team that has the PRO license — if you have multiple teams, the wrong team may result in a BASIC license.
Then start the license server before building:
npx --yes needle-cloud start-serverOption 2: Use a NEEDLE_CLOUD_TOKEN environment variable
Create an access token on your Needle Cloud team page with read/write permissions. Then set it as an environment variable:
export NEEDLE_CLOUD_TOKEN=your_token_here
npx --yes needle-cloud start-server
In CI/CD, add NEEDLE_CLOUD_TOKEN as a repository secret and expose it in your workflow.
After starting the license server, run your build as usual (e.g. npm run build).
Learn more: Needle Cloud Documentation - Starting the License Server
My build uses a BASIC license even though I have PRO
This typically happens when the license server can't find your PRO license. Common causes:
- Wrong team selected: If you have multiple Needle Cloud teams, make sure you're logged in to the team that owns the PRO license. Run
npx needle-cloud loginand select the correct team. You can verify your current account and team withnpx needle-cloud me. - No access token set in CI/CD: In automated environments, set the
NEEDLE_CLOUD_TOKENenvironment variable with a token from your PRO team. See How do I activate my license in a standalone web project or CI/CD? above. - License server not running: If you're using Unity or Blender with a Needle scene open, the license server is started automatically. Otherwise, run
npx --yes needle-cloud start-serverbefore your build command.
I applied for an EDU license — what's next?
Great, thanks for applying! Here's what to expect:
Your application is being reviewed. We review every single application by hand. Depending on volume this can take anywhere from a few days to several weeks — we appreciate your patience while we work through submissions.
Approval is not guaranteed. We do our best to support educators and students, but we can't approve every application. If your application is approved, we'll reach out by email.
You can start right now. You don't have to wait — download Needle Engine and start building today. You can deploy to Needle Cloud right away with the free Basic license:
Try the samples, follow the tutorials, and get familiar with the workflow while your application is in review.
Need a license sooner? You can always purchase a license at any time at needle.tools/pricing — no need to wait for the EDU review.
Questions? Reach out on our Forum or Discord.
I'm a teacher with an EDU license — how do I give my students access?
Your EDU license belongs to your Needle Cloud team, and you share it by inviting your students as members of that team. You don't request a separate license per student.
- Open your Needle Cloud team page.
- Invite each student as a member (for example, using their school email address).
- Once they accept, they're covered by the team's EDU license and can deploy their projects to your team.
So for an Intro to VR class teaching the Unity-to-Needle workflow: each student doesn't apply for their own EDU license — you apply once, then add the whole class as members of your team. Their work is then covered for the duration of the course.
When the course ends, you can remove students from the team to free up seats for the next cohort.
Can a faculty-led class project be hosted on Needle Cloud under our EDU license?
Yes. A project that you set up for students to learn from and contribute to during class can be hosted on Needle Cloud under your team's EDU license. Add the students as members of the team (see above) so they can deploy to and collaborate on the shared project.
I'm attending a course that uses Needle Engine — how do I get access?
If your course already uses Needle Engine, you don't need to apply for your own license. Ask your teacher or instructor to invite you to their Needle Cloud team. Once you're added, you'll have access to the EDU license through their team — no separate application needed.
Not sure if your course has a license? Check with your instructor. If they already have an EDU license, they can invite students from their Needle Cloud team page. If they don't have one yet, suggest they apply for an EDU license — it's free for eligible educators and can cover the entire class.
I'm a student — how do I get an EDU license?
The fastest way is through your teacher or school. A single EDU license applied for by an educator can cover all students in a course or program. If your instructor hasn't heard of Needle Engine yet, point them to our EDU pricing.
If you're applying individually, a strong application makes a real difference:
- Use your edu or school email address — this helps us verify your enrollment.
- Include your portfolio or links to your work — show us what you've been building.
- Describe what you're planning to build — tell us how you'll use Needle Engine in your studies or projects.
You don't have to wait for the review — you can start building and deploying to Needle Cloud right away with the free Basic license. A Pro or EDU license unlocks higher storage limits and additional export options in Unity and Blender.
What makes a strong EDU application?
We review every application individually. Here's what helps yours stand out:
- Use an edu or school email address rather than a personal email (Gmail, Yahoo, etc.).
- Include a portfolio or examples of your work — even a simple website, GitHub profile, or project screenshots.
- Write a clear description of what you plan to build with Needle Engine and how it fits into your course or research.
- Teachers: Mention your course name, class size, and how Needle Engine will be used in the curriculum.
Applications with these details are much easier for us to evaluate and approve.
Can I use Needle Engine for a hackathon or game jam?
Yes, absolutely! We love seeing Needle Engine used at hackathons, game jams, art installations, and creative events. You can get started right away with the free Basic license — download Needle Engine, build your project, and deploy to Needle Cloud.
Please keep in mind that the EULA applies to all usage. If your hackathon project turns into something bigger or commercial, you'll need a Pro license.
Have fun building!
I made something with Needle Engine — how can I share it?
We'd love to see what you've built! Here are the best ways to share your project with us and the community:
- Email: Send it to hi@needle.tools — we read every message.
- Discord: Share it in our Discord community — great for getting feedback and connecting with other creators.
- Forum: Post it on the Needle Forum — ideal for longer write-ups and discussions.
We genuinely enjoy seeing what people create with Needle Engine, and we may feature outstanding projects on our official showcase or social channels.
How can I access showcase projects?
Several showcase projects are available for reference and learning, including the Bike Configurator, Castle Builder, and the Needle Website. Access to showcase projects requires a Pro license. Please contact hi@needle.tools for access.
I didn't receive a confirmation email
If you haven't received a confirmation email after signing up or purchasing a license, please check the following:
- Check your spam/junk folder – confirmation emails sometimes end up there.
- Make sure you entered the correct email address during registration.
- Wait a few minutes – emails can sometimes be delayed.
If you're still not receiving emails, there may be a service disruption. Check our Status Page for current incidents or outages. If everything looks fine and you still haven't received the email, reach out to us at hi@needle.tools.
Can I change the billing email address for invoices?
Yes. Go to your team's Billing section on Needle Cloud, click Edit, then click Edit Payment Info. There you can change the invoice email address, billing address, payment methods and cards, tax ID, and review past payments and upcoming invoices. The billing email doesn't have to match your Needle account email.
How do I delete my Needle account?
Account deletion is currently handled manually. To delete your account, send a request from your registered email address to hi@needle.tools and we'll take care of it.
Can I remove the Needle Engine logo and branding (white-labelling)?
Yes, the Needle Engine logo and branding can be removed with an EDU, PRO, or Enterprise license. This allows you to fully white-label your web experiences with your own branding.
The logo appears in the NeedleMenu — the bottom-center toolbar in your web experience. In Unity, this is controlled by the NeedleMenu component. In code, you can access it via this.context.menu.
With a qualifying license, the Needle logo and branding button are automatically removed from the menu — you don't need to call anything.
To hide the logo explicitly from code, call showNeedleLogo(false) on the menu (a method on NeedleMenu, accessed via this.context.menu):
// from inside a component
this.context.menu.showNeedleLogo(false);
Hiding the logo requires an EDU, PRO, or Enterprise license; without one the call has no effect in production.
Logo and branding removal is an entitlement of the license currently active on your account, not a one-time switch. If your license lapses or is downgraded, the experience reverts to the default Needle branding until a qualifying license is active again.
I have an Indie license — is it still supported?
The Indie license tier is no longer available for purchase, but existing Indie licenses continue to work exactly as before — including any white-labeling and logo-removal entitlements they came with. Note that the Indie tier may be removed entirely in the future. For new projects, choose an EDU, PRO, or Enterprise license. If you're unsure which plan fits your project, reach out to us at hi@needle.tools.
How do I remove the bottom bar / NeedleMenu?
The bottom-center toolbar is the NeedleMenu. To remove it entirely, delete or disable the NeedleMenu component in Unity. In code, you can access it via this.context.menu.
Note that removing the Needle branding button from the menu requires an EDU, PRO, or Enterprise license. With a Basic license the branding button must remain visible.
Installation & Setup
My local server does not start / I do not see a website
The most likely reason is an incorrect installation. Check the console and the Needle Engine component for errors or warnings. Also check the local server terminal window that opens automatically — it often contains additional error details.
If these warnings/errors didn't help, try the following steps in order. Give them some time to complete. Stop once your problem has been resolved. Check the console for warnings and errors.
- Make sure you follow the Prerequisites.
- Install your project by selecting your
Needle Enginecomponent and clickingInstall - Run a clean installation by selecting your
Needle Enginecomponent, holding Alt and clickingClean Install - Try opening your web project directory in a command line tool and follow these steps:
- run
npm installand thennpm run dev - Make sure both the local runtime package (
node_modules/@needle-tools/engine) as well as three.js (node_modules/three) did install.
- run
My local website shows an SSL error e.g. 'Your connection is not private'
You might see a warning in your browser about SSL Security depending on your local configuration.

This is because while the connection is encrypted, by default there's no SSL certificate that the browser can validate. If that happens: click Advanced and Proceed to Site. In Safari, you might need to refresh the page afterwards, because it does not automatically proceed. Now you should see your scene in the browser!
The dialogue should only show up once for the same local server
Tips
Connections are secured, because we're enforcing HTTPS to make sure that WebXR and other modern web APIs work out-of-the-box. Some browsers will still complain that the SSL connection (between your local development server and the local website) can't be automatically trusted, and that you need to manually verify you trust that page. Automatic Page Reload and Websocket connections may also be affected depending on the browser and system settings.
See the Testing docs for information on how to set up a self-signed certificate for a smoother development experience.
My local website stays black
If that happens there's usually an exception either in engine code or your code. Open the dev tools (Ctrl + Shift + I or F12 in Chrome) and check the Console for errors. In some cases, especially when you just updated the Needle Engine package version, this can be fixed by stopping and restarting the local dev server. For that, click on the running progress bar in the bottom right corner of the Editor, and click the little ✕ to cancel the running task. Then, simply press Play again.
Installing the web project takes forever / does never finish / EONET: no such file or directory
- Make sure to not create a project on a drive formatted as exFAT because exFAT does not support symlinks, which is required for Needle Engine for Unity prior to version 3.x. You can check the formatting of your drives using the following steps:
- Open "System Information" (either windows key and type that or enter "msinfo32" in cmd)
- Select Components > Storage > Drives
- Select all (Ctrl + A) on the right side of the screen and copy that (Ctrl + C) and paste here (Ctrl + V)
NPM install fails and there are errors about hard drive / IO
Make sure your project is on a disk that is known to work with node.js. Main reason for failures is that the disk doesn't support symlinks (symbolic links / softlinks), which is a requirement for proper functioning of node.js. NTFS formatting should always work. Known problematic file system formattings are exFAT and FAT32.
To check the format of your drives, you can:
- Open "System Information" (either Windows key and type "System Information" or enter
msinfo32in cmd Windows + R) - Select "Components > Storage > Drives"
- There, you can see all drives and their formatting listed. Put your projects on a drive that is NTFS formatted.
Toktx can not be found / toktx is not installed
Make sure to download and install toktx
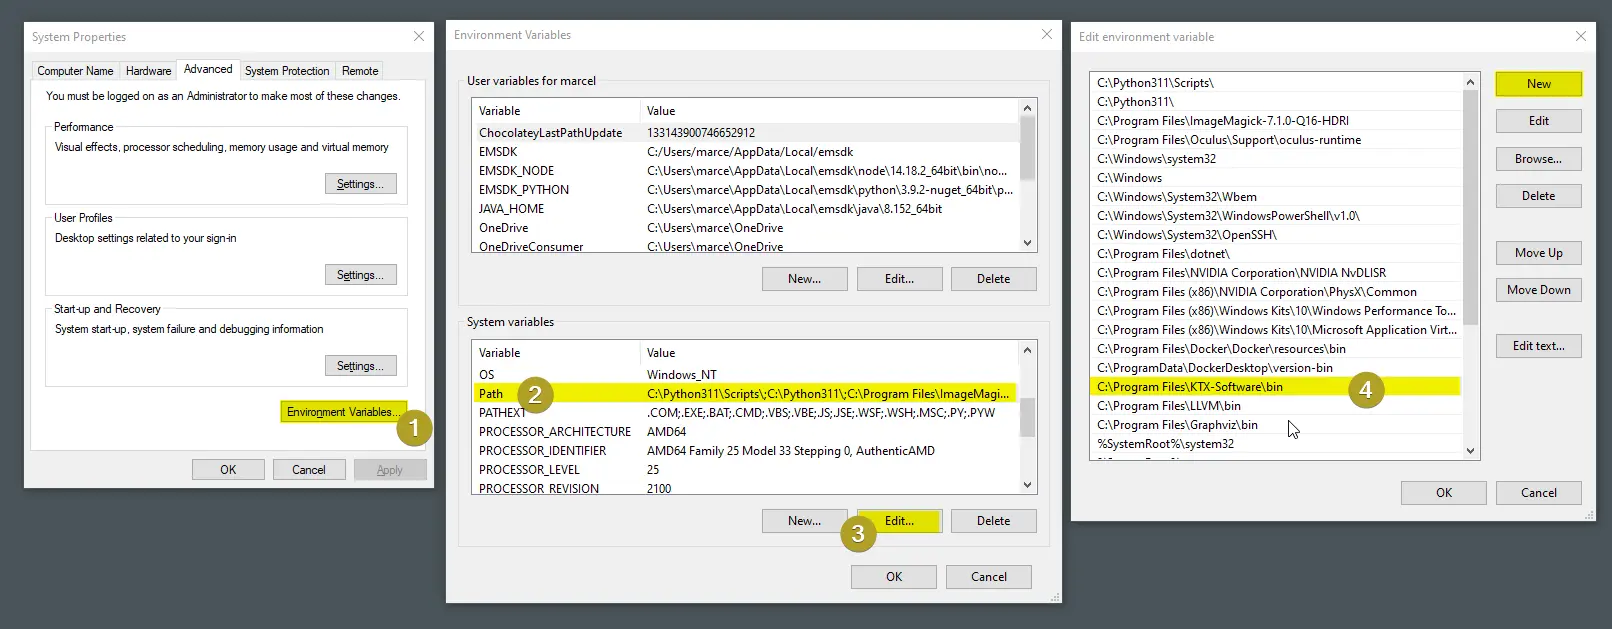
On Windows: Make sure you have added toktx to your system environment variables. You may need to restart your computer after adding it to refresh the environment variables. The default install location is
C:\Program Files\KTX-Software\bin
I'm getting an error 'failed to load config ... vite.config.js' when running npm commands on Mac OS
You're likely using an x86_64 version of Unity on an (ARM) Apple Silicon processor. Unity 2020.3 is only available for x86_64, later versions also have Apple Silicon versions. Our Unity integration calling npm will thus do so from an x86_64 process, resulting in the x86_64 version of node and vite/esbuild being used. When you afterwards try to run npm commands in the same project from an Apple Silicon app (e.g. VS Code), npm will complain about mismatching architectures with a long error message.
To fix this, use an Apple Silicon version of Unity (2021.1 or later).
You can also temporarily fix it on 2020.3 by deleting the node_modules folder and running npm install again from VS Code. You'll have to delete node_modules again when you switch back to Unity.
How do I upgrade the Needle Engine Unity package?
There are two ways to upgrade:
Via the Needle Engine component: At the bottom of the
Needle Enginecomponent in the Inspector, an update button will appear when a new version is available. Simply click it to upgrade.Via Unity's Package Manager: Open
Window/Package Manager, find the Needle Engine package, and update it from there. To access beta, alpha, or other preview versions, you need to enable preview packages in the Package Manager settings first.
How can I override the Needle Engine version in my web project?
Tips
This only applies to web projects managed by Unity or Blender. Only do this when asked by the Needle Engine developers, for example to test a specific version or pre-release build.
In Unity/Blender managed web projects, the @needle-tools/engine version is controlled by the integration automatically. To override it, add the npm: prefix in your package.json:
{
  "dependencies": {
    "@needle-tools/engine": "npm:@needle-tools/engine@^4.16.0"
  }
}
Then run npm install to install the overridden version and restart your dev server. The npm: prefix tells the Unity/Blender integration that you are intentionally overriding the version, so it won't revert your change.
Once you're done testing, remove the npm: prefix and restore the original version, or update your Unity/Blender package to match.
I get 'Failed to resolve import "./register_types.js"' after upgrading from Needle Engine 3.x to 5.x
If you see an error like this after opening your web project:
Failed to resolve import "./register_types.js" from "src/generated/gen.js". Does the file exist?This is caused by your web project still using Vite 4, which is incompatible with Needle Engine 4.x and later. You need to update your project's build tooling to Vite 8.
Update the following in your package.json:
{
  "devDependencies": {
    "vite": "^8.0.0",
    "@vitejs/plugin-basic-ssl": "2",
    "vite-plugin-compression2": "^2.5.2"
  }
}
Tips
If your project previously used vite-plugin-compression (v1), replace it with vite-plugin-compression2 and update any imports in your vite.config.js accordingly.
After updating package.json, delete your node_modules folder and package-lock.json, then run npm install again.
You can use the Vite template as a reference for the correct project setup and dependencies.
What are package.json and package-lock.json?
See Project Structure – package.json for a full explanation of these files and how they relate to your project.
The Node.js installer asks about Chocolatey – is it needed?
No, Chocolatey is not needed. During installation, the Node.js installer may show an option to install Chocolatey (a package manager for Windows). You can safely uncheck this option. Needle Engine does not use or require Chocolatey.
Which Node.js version should I use?
We recommend Node.js 22 LTS or 24 LTS. Older versions (including Node 18, and Node 20 below 20.19) are no longer supported by the build tools Needle Engine relies on.
The Getting Started guide also lists this as a prerequisite, with download links for Windows and macOS.
Check your installed version with node -v in a terminal.
Vite says my Node.js version is too old / SyntaxError: ... does not provide an export named 'styleText'
If you see an error like this when running npm run dev:
You are using Node.js 20.9.0. Vite requires Node.js version 20.19+ or 22.12+. Please upgrade your Node.js version.
SyntaxError: The requested module 'node:util' does not provide an export named 'styleText'
…your Node.js version is too old. Vite 8 (used by recent Needle Engine versions) requires Node.js 20.19+ or 22.12+.
Fix: Install a current LTS from the Node.js download page — see Which Node.js version should I use? for our recommendation.
I don't have any buttons like "Generate Project" in my components/inspector
Please check that you're not accidentally in the Inspector's Debug mode – switch back to Normal: 
Scripting & Export
My scripts don't work after export
- Your existing C# code will not export as-is, you have to write matching typescript / javascript for it.
- Needle uses typescript / javascript for components and generates C# stubs for them.
- Components that already have matching JS will show that in the Inspector.
My custom TypeScript component doesn't show up in the Unity/Blender component menu
Make sure your script is located inside the web project's src/scripts folder. The Needle component compiler only picks up scripts in this folder to generate the matching Unity stub components / Blender component panels — components placed elsewhere won't appear in Unity's or Blender's component menu.
You can change which folder is watched via the scriptsDirectory setting in needle.config.json (it defaults to src/scripts). When you change the config, restart Blender for the new setting to take effect.
Does C# component generation work with javascript only too?
While generating C# components does technically run with vanilla javascript too we don't recommend it and fully support it since it is more guesswork or simply impossible for the generator to know which C# type to create for your javascript class. Below you find a minimal example on how to generate a Unity Component from javascript if you really want to tho.
import { Behaviour } from "@needle-tools/engine";

export class MyScript extends Behaviour
{
    //@type float
    myField = 5;
}
My custom TypeScript class fields don't show up in the Unity/Blender Inspector
The Needle component compiler only auto-generates editor stubs for classes that extend Behaviour (i.e. components). If you define a plain TypeScript class (e.g. a custom data class used inside a component), it will not be generated automatically — you need to create the matching class in your editor project yourself.
For example, if you have:
import { Behaviour, serializable } from "@needle-tools/engine";
import { Object3D } from "three";

export class WaypointData {
    @serializable()
    speed: number = 1;

    @serializable(Object3D)
    target: Object3D | null = null;
}

export class WaypointController extends Behaviour {
    @serializable([WaypointData])
    waypoints: WaypointData[] = [];
}
The component compiler will generate a stub for WaypointController (because it extends Behaviour), but not for WaypointData. You must create the matching class manually in your editor project.
Create a C# class in your Unity project:
[System.Serializable]
public class WaypointData
{
    public float speed = 1;
    public GameObject target;
}Custom non-component classes are currently not supported in the Blender integration. As a workaround, consider restructuring your data so that the fields are directly on the component itself, or use separate components instead of nested data classes.
Without this class, the waypoints field on WaypointController will not be editable in the Inspector.
I created a new script in a sub-scene but it does not work
When creating new scripts in npmdefs in sub-scenes (that is a scene that is exported as a reference from a script in your root export scene) you currently have to re-export the root scene again. This is because the code-gen that is responsible for registering new scripts currently only runs for scenes with a Needle Engine component. This will be fixed in the future.
Uncaught ReferenceError: NEEDLE_ENGINE_META is not defined / NEEDLE_USE_RAPIER is not defined
If you are using Vite or next.js make sure to add the Needle Engine plugins to your config. Example for Vite:
const { needlePlugins } = await import('@needle-tools/engine/plugins/vite/index.js');
plugins: [needlePlugins(command, needleConfig)]
Example for next.js
const { needleNext } = await import("@needle-tools/engine/plugins/next/index.js");
return needleNext({}, { modules: { webpack } });
You can also just declare the missing variables in e.g. your root index.html in a script tag like so:
<script>
  var NEEDLE_ENGINE_META = {}
  var NEEDLE_USE_RAPIER = true;
</script>
I'm getting errors with "Unexpected token @. Expected identifier, string literal, numeric literal or ..."
Needle Engine uses typescript decorators for serialization. To fix this error make sure to enable experimentalDecorators in your tsconfig.json
Circular reference error
This can happen when you have e.g. a SceneSwitcher (or any other component that loads a scene or asset) and the referenced Asset in Unity contains a GltfObject that has the same name as your original scene with the SceneSwitcher. You can double check this in Unity if you get an error that says something like:
Failed to export ↑ YourSceneName.glb
you seem to have objects with the same name referencing each other.
To fix this you can:
- Remove the
GltfObjectin the referenced Prefab or Scene - Rename the GameObject with the component that loads the referenced scenes
If this doesn't fix the problem please ask in our forum.
My scene is not loading and the console contains a warning with 'circular references' or 'failed to update active state'
Please see the circular reference error section.
My references to UI objects (Canvas, Image) are wrong or null at runtime
If you reference a UI object's Transform in Unity and use @serializable(Object3D) in TypeScript, the reference won't resolve correctly at runtime. This is because UI objects use RectTransform, which — unlike regular Transform — exists as a separate component in Needle Engine (it holds layout data). The @serializable type must match what is actually referenced: if Unity points to a RectTransform, the TypeScript field must use RectTransform too.
Fix: declare the field as RectTransform:
import { RectTransform } from "@needle-tools/engine";

@serializable(RectTransform)
myCanvas: RectTransform | null = null;

// Access the Object3D via this.myCanvas?.gameObject
Alternatively, if you only need the Object3D, override the C# type so Unity exports a GameObject reference instead:
// @type UnityEngine.GameObject
@serializable(Object3D)
myCanvas: Object3D | null = null;
My UI is not rendering Text
- For Unity: Make sure that you use the
UI/Legacy/Textcomponent and not theTextMeshPro - Textcomponent
My UI Text is missing certain characters (e.g. Chinese, Japanese, Korean)
The font atlas generated at export only contains characters from your scene's Text components plus default ASCII/European characters. To include additional characters (e.g. for runtime text), add a FontAdditionalCharacters component to your scene. The font itself must also support those characters.
See How to add spatial UI text for full details.
How do I assign a font in a custom component in Unity?
When writing a custom TypeScript component with a font field, you can make Unity show a proper Font picker in the Inspector instead of a plain string field. At runtime the value is a URL to the auto-generated MSDF font atlas.
There are two equivalent approaches:
Option 1 — type alias (recommended):
import { Behaviour, serializable } from "@needle-tools/engine";

type Font = string;

export class MyTextComponent extends Behaviour {
    @serializable(URL)
    font: Font | null = null;
}
Option 2 — // @type comment:
import { Behaviour, serializable } from "@needle-tools/engine";

export class MyTextComponent extends Behaviour {
    // @type UnityEngine.Font
    @serializable(URL)
    font: string | null = null;
}
Both cause the component compiler to generate public UnityEngine.Font font; in the C# stub, so Unity users can drag-and-drop a font asset into the Inspector field. During export, Needle Engine automatically generates the MSDF font atlas and serializes the font as a URL string.
Rendering & Visuals
Can I use camera stacking (URP overlay cameras) to render UI without post-processing?
No, Unity's URP camera stacking is not supported in Needle Engine. The overlay camera concept does not translate to the three.js rendering pipeline used under the hood.
Alternatives for rendering world-space UI above the 3D scene without post-processing:
- HTML/CSS overlay: Use HTML elements positioned over the 3D canvas. This naturally bypasses post-processing since it's outside the WebGL context and is the recommended approach for most UI.
- Custom render pass: Implement a second render pass using three.js render layers with
autoCleardisabled in a custom component.
I can't set camera clear flags or priority in Unity (URP)
In Unity's Universal Render Pipeline, clear flags and camera priority cannot be configured from the Inspector UI for Needle Engine export. These settings must be set from code at runtime.
In your TypeScript component, you can access the camera's clear flags via the three.js camera and renderer:
// Example: set clear flags in code
this.context.renderer.autoClear = false;
this.context.renderer.setClearColor(0x000000, 0); // transparent background
Camera stacking and overlay cameras from URP are not supported.
My objects are white after export
This usually happens when you're using custom shaders or materials and their properties don't cleanly translate to known property names for glTF export. You can either make sure you're using glTF-compatible materials and shaders, or mark shaders as "custom" to export them directly.
- Read more about recommended glTF workflows: Exporting Materials
- Read more about custom shaders: Custom Shaders
Does Needle Engine support custom lit shaders?
Yes! Needle Engine supports custom lit and unlit shaders via MaterialX — the industry-standard format for portable material definitions.
You can author MaterialX materials in Unity's Shader Graph and export them automatically, or load standalone .mtlx files at runtime from any authoring tool (Maya, Houdini, Omniverse, and more).
There is also a WebGL2 export path, but that only supports unlit shaders. For lit shaders, use MaterialX.
Tips
Shader Graph → MaterialX export requires a Pro, Edu, or Enterprise plan. Loading external .mtlx files works on all plans. See Pricing.
Where are my baked lightmaps stored after export? Is the lighting texture included in the glb?
Yes. Lightmap textures are embedded directly in the glTF file via the NEEDLE_lightmaps extension. They are not saved as separate files — they are stored as textures in the .glb alongside your scene data and are automatically optimized by the Needle compression pipeline during production builds.
How do I display lightmaps from a glTF/glb file in three.js?
Needle Engine handles this automatically. When loading a .glb file that contains lightmap data (via the NEEDLE_lightmaps extension), Needle Engine applies the lightmap textures to the correct materials — no manual setup required. You do not need to manually set UV channels, texture transforms, or material properties.
If lightmaps are not displaying correctly, please report the issue in our forum with a sample scene so we can investigate.
My lightmaps look different / too bright
Ensure you're following best practices for lightmaps and read about mixing baked and non-baked objects
My scene is too bright / lighting looks different than in Unity
Make sure that your lights are set to "Baked" or "Realtime". "Mixed" is currently not supported.
- Lights set to mixed (with lightmapping) do affect objects twice in three.js, since there is currently no way to exclude lightmapped objects from lighting
- The
Intensity Multiplierfactor for Skybox inLighting/Environmentis currently not supported and has no effect in Needle Engine
- Light shadow intensity can currently not be changed due to a three.js limitation.
Also see the docs on mixing baked and non-baked objects.
My skybox resolution is low? How to change my skybox resolution
If you use a custom cubemap: You can override the texture import settings of the skybox texture (assigned to your cubemap)

If you use the default skybox: Add a
SkyboxExportSettingscomponent anywhere in your scene to override the default resolution
Do you offer free skyboxes / HDRI environments?
Yes — and they're built right into Needle Cloud. When you upload an asset, the viewer's Rendering panel lets you pick from 27+ free FastHDR skyboxes (indoor studios, outdoor landscapes, cityscapes, and more) and configure how the asset is lit and displayed — no code required. You can set the environment intensity and rotation, the background intensity, blur, and rotation, and toggle Ground Projection right in the viewer, then share or embed the result. Browse the full set in the Needle HDR Library.
They're pre-optimized in FastHDR format, so they load ~10× faster than EXR and use ~95% less GPU memory — great even on mobile.
Prefer your own environment? You can bring your own .exr / .hdr (HDRi) and use it directly:
- On Needle Cloud — upload your HDRi/EXR and it's compressed to a hosted FastHDR (KTX2) texture you can select in the viewer, just like the built-in ones.
- In Unity or Blender — assign any
.exr/.hdras your scene's Environment Lighting; it's converted to FastHDR automatically during the production build.
For code-only or three.js projects, point the environment-image / background-image attributes at any library URL — or use a built-in preset like studio with no URL at all:
<!-- A FastHDR skybox by URL (a library HDRI, or your own uploaded to Needle Cloud) -->
<needle-engine
  environment-image="https://cloud.needle.tools/-/assets/ZUBcksTan5t-Tan5t-hdri-pmrem/file.pmrem.ktx2"
  background-image="https://cloud.needle.tools/-/assets/ZUBcksTan5t-Tan5t-hdri-pmrem/file.pmrem.ktx2"
  background-blurriness="0.3">
</needle-engine>

<!-- Or a built-in preset, no URL needed -->
<needle-engine environment-image="studio" background-image="studio"></needle-engine>
See the FastHDR documentation and Environment Lighting in Blender for details.
How can I create FastHDR environment textures (compressed EXR)?
FastHDR is Needle's GPU-native, compressed environment texture format for skyboxes and image-based lighting. It's built on KTX2 (UASTC HDR 4x4) supercompression with pre-computed PMREM, so it loads ~10x faster than EXR, uses ~95% less GPU memory, and works great on mobile and low-end devices — while looking identical to your source HDR/EXR.
There are two ways to create FastHDR textures:
- Let Needle Engine for Unity or Blender do it at build time. Assign any
.hdr/.exras your scene's environment lighting, and the production build optimization step automatically converts it to FastHDR — no manual step required. - Upload an HDRi or EXR file to Needle Cloud for compression. This is useful for a standalone
.hdr/.exrfile that isn't part of a Unity or Blender scene. Needle Cloud compresses it to a hosted KTX2 FastHDR texture you can load at runtime via theenvironment-image/background-imageattributes.
You can also browse 27+ ready-made FastHDR environments in the Needle HDR Library. See the FastHDR documentation for details.
My Shadows are not visible or cut off
Please the following points:
- Your light has shadows enabled (either Soft Shadow or Hard Shadow)
- Your objects are set to "Cast Shadows: On" (see MeshRenderer component)
- For directional lights the position of the light is currently important since the shadow camera will be placed where the light is located in the scene.
My colors look wrong
Ensure your project is set to Linear colorspace.

Why does my Blender scene have a green tint or different color after building / deploying to Needle Cloud?
This was a known bug in the Needle Engine Blender add-on versions 1.0.0 to 1.0.2. It caused incorrect encoding during environment map compression, which gave some scenes a greenish tint. The issue only affected certain EXR environment textures (e.g. the built-in forest.exr) and only occurred in Blender — Unity was not impacted.
Fix: Update the Needle Engine Blender add-on to version 1.0.3 or newer. The bug has been resolved and no further action is needed after updating.
Tips
In general, regularly checking for updates to the Needle Engine add-on is good practice to benefit from bug fixes and new features.
THREE.EXRLoader: provided file doesnt appear to be in OpenEXR format
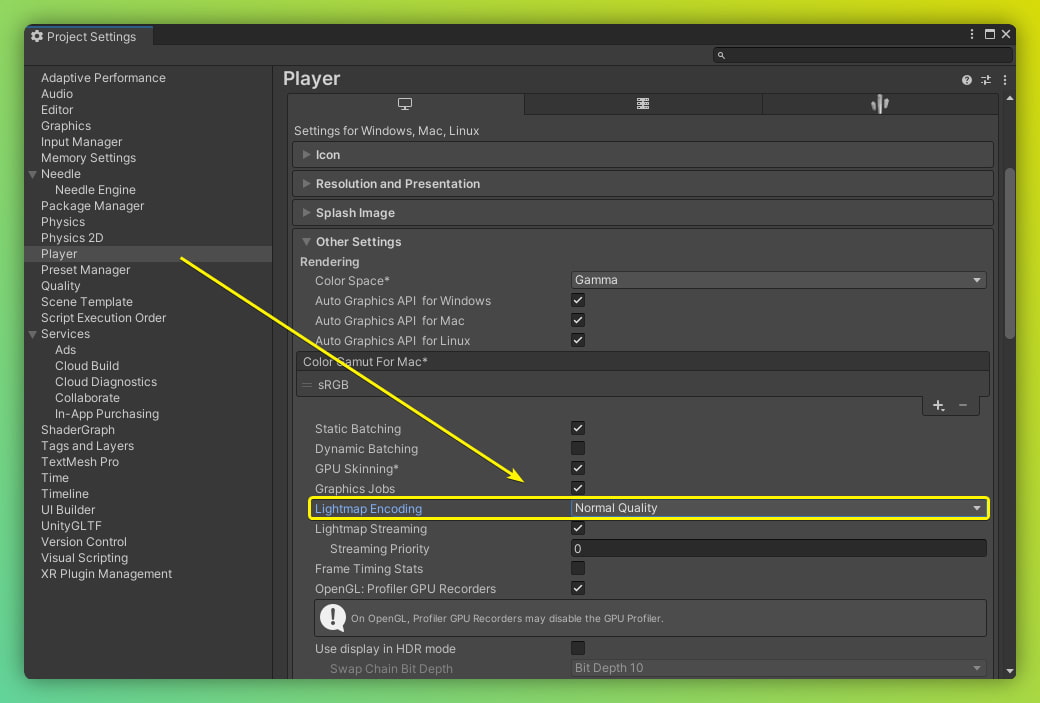
Please make sure that sure that you have set Lightmap Encoding to Normal Quality. Go to Edit/Project Settings/Player for changing the setting.
Blender: Why does postprocessing not work?
If postprocessing in Blender does not work as expected, try the following:
- Disable auto postprocessing in the Needle dropdown above the viewport (Needle icon foldout)
- Add all postprocessing effects on the same object in Blender — currently effects need to be on the same object to work together. This requirement will be relaxed in a future update where it won't matter where effects are placed in the scene.
Tips
We're actively working on improving postprocessing for Blender. Future updates will bring more effects and remove the requirement to place them on the same object.
Animation
How can I play animations in Needle Engine?
Needle Engine has several ways to play animations, and most of them need little or no code — you author them in Unity or Blender and they run on the web. From simplest to most powerful:
| Approach | Best for | No-code in editor? | Trigger from UI? |
|---|---|---|---|
Animation component | A single clip, or a few clips you start one at a time | Yes | Yes (Button → play) |
Animator / AnimatorController | Multiple states (idle → walk → run, or step 1 → 2 → 3) with conditions, blending, and chained playback | Yes | Yes (set parameters) |
Timeline (PlayableDirector) | A sequence of clips that play one after another, with synced audio, camera moves, and other tracks | Yes | Yes (Button → play) |
Everywhere Actions (PlayAnimationOnClick) | No-code click-to-play that also works in AR / USDZ on iOS | Yes | Click on object |
Code (animation.play(), builders) | Fully custom or runtime-generated sequences | — | Yes (call from code) |
For most "play this, then that" needs — especially with audio — reach for Timeline before writing your own sequencing code.
See the full guide: Play Animations — editor (no-code) setup, triggering from UI, controlling from code, and building animations/timelines/controllers at runtime.
How do I play multiple animations one after another, with sound, triggered by a button?
Use a Timeline driven by a PlayableDirector component. Arrange your animation clips and audio clips on tracks along one shared timeline (Unity Timeline or Blender NLA), leave playOnAwake off, and start the whole sequence with a single director.play() — wired to a Button's onClick (no code) or called from a component. play() returns a promise that resolves once the entire sequence finishes. You generally don't need to write your own sequencing controller.
For the full walkthrough — including the button script, building the sequence in code with TimelineBuilder, and the AnimatorController alternative — see Play Animations → Play a sequence with sound on a button press.
Performance
My website becomes too large / is loading slow (too many MB)
This can have many reasons, but a few common ones are:
- too many textures or textures are too large
- meshes have too many vertices
- meshes have vertex attributes you don't actually need (e.g. have normals and tangents but you're not using them)
- objects are disabled and not ignored – disabled objects get exported as well in case you want to turn them on at runtime! Set their Tag to
EditorOnlyto completely ignore them for export. - you have multiple
GltfObjectcomponents in your scene and they all haveEmbedSkyboxenabled (you need to have the skybox only once per scene you export)
If loading time itself is an issue you can try to split up your content into multiple glb files and load them on-demand (this is what we do on our website). For it to work you can put your content into Prefabs or Scenes and reference them from any of your scripts. Please have a look at Scripting Examples in the documentation.
Can I load GLB files from a CDN, S3 bucket, or external URL instead of bundling them?
Yes. Every loading API in Needle Engine accepts a full URL, so you can host GLBs on Needle Cloud, AWS S3, Cloudflare R2, your own CDN, or any static web host, and load them at runtime instead of bundling them into your build. This is useful when you have many models, update assets without rebuilding, or work with user-generated content.
You have four options depending on the use case:
<needle-engine src="https://…/scene.glb">— set the root scene to a hosted URL from HTML.SceneSwitcher.addScene(url)— best for galleries, configurators, or 20+ models. Add URLs at runtime; preload, swipe, keyboard nav all work the same as bundled scenes.AssetReference.getOrCreate(baseURI, url)+instantiate()— cache one asset by URL and spawn multiple independent copies. Same API as Unity/Blender prefab references.loadAsset(url)— quick one-off load returning a model wrapper (.scene,.animations, …).
Quick SceneSwitcher example loading from a mix of hosts:
import { addComponent, SceneSwitcher } from "@needle-tools/engine";

const switcher = addComponent(scene, SceneSwitcher, { autoLoadFirstScene: false });
switcher.addScene("https://cloud.needle.tools/-/assets/Z23hmXBZ21QnG-latest-world/file");
switcher.addScene("https://your-bucket.s3.amazonaws.com/products/chair-red.glb");
switcher.addScene("https://your-cdn.com/models/lamp.glb");
switcher.select(0);
The host must serve the file with correct CORS headers (Access-Control-Allow-Origin) and ideally Content-Type: model/gltf-binary. Needle Cloud handles this automatically and adds progressive loading (~90% less bandwidth), automatic KTX2/Draco compression, a global CDN, and moveable version labels — point your app at a main-labeled URL once, then ship asset updates by promoting new versions in the dashboard, without rebuilding or redeploying your app.
See the full guide: Load 3D Web Assets at Runtime.
How can I override compression or LOD settings for individual textures?
You don't need to change global settings when only a few textures need special treatment. Both Unity and Blender let you override compression format, max resolution, and progressive LOD generation per texture — while keeping the defaults for everything else.
Unity: The Compression and LOD Settings component (on the Needle Engine / ExportInfo object) has a Per-Texture Overrides section. Assign any texture you want to customize and override its compression format (ETC1S, UASTC, WebP), max size, or toggle LOD generation individually.
Blender: Open the Properties panel → Material tab → Needle Material Settings. Each texture used by the material is listed with an override toggle. Enable it to set a custom max size and compression format for that texture.
See Texture Compression: Per-Texture Overrides for screenshots and step-by-step instructions.
Can I disable or enable progressive texture LODs for specific textures only?
Yes — and this is much better than disabling progressive loading globally. Progressive texture LODs dramatically reduce initial load times by loading small preview textures first and streaming full resolution on demand. If a specific texture doesn't look right with the default LOD settings, override just that texture instead of turning off the whole feature.
Unity: On the Compression and LOD Settings component, add the texture to the per-texture overrides list. You can disable LOD generation for that one texture, or change the LOD preview size — while all other textures keep benefiting from progressive loading.
Blender: Per-texture compression overrides are available in Properties → Material tab → Needle Material Settings. The global progressive texture size can be configured in the Needle Engine Project Settings.
See Progressive Loading & LODs and gltf-progressive for more details.
Can I manually control when the loading overlay hides instead of it auto-hiding?
The default loading overlay automatically hides when all assets finish loading. There is currently no built-in API to prevent this auto-hide and then manually dismiss it later.
However, since the default loading style is very minimal, a practical approach is to use your own custom loading overlay and control it via the loadstart and loadfinished events:
<!-- Your custom loading overlay -->
<div id="loading-overlay">
  <p>Loading...</p>
</div>

<needle-engine src="scene.glb"></needle-engine>

<script>
  const overlay = document.getElementById("loading-overlay");
  const engine = document.querySelector("needle-engine");

  // Show overlay when loading begins
  engine.addEventListener("loadstart", () => {
    overlay.style.display = "flex";
  });

  // When assets are loaded, do your custom initialization
  // before hiding the overlay
  engine.addEventListener("loadfinished", async (ev) => {
    // Do your custom setup here, e.g. wait for animations,
    // additional data, or other async work
    await myCustomInitialization();

    // Now signal the app is ready
    overlay.style.display = "none";
  });
</script>
This way you have full control over when the overlay disappears — you can wait for additional async work, animations, or any other "app ready" signal before hiding it.
How do I preload audio?
By default an AudioSource only loads its audio clip the first time it plays, which can cause a short delay on the first playback. To load the clip up front instead, enable the Preload toggle on the AudioSource component:
- Unity: Open the Additional Audio Data section via the button at the bottom of the
AudioSourcecomponent, then enable Preload. - Blender: Enable the Preload toggle on the
AudioSourcecomponent.
When preload is enabled the clip starts loading as soon as the scene starts. In code you can also set it directly:
audioSource.preload = true;Networking
I'm using networking and Glitch and it doesn't work if more than 30 people visit the Glitch page at the same time
- Deploying on Glitch is a fast way to prototype and might even work for some small productions. The little server there doesn't have the power and bandwidth to host many people in a persistent session.
- We're working on other networking ideas, but in the meantime you can host the website somewhere else (with node.js support) or simply remix it to distribute load among multiple servers. You can also host the networking backend package itself somewhere else where it can scale e.g. Google Cloud.
Platform Support
Does it work on mobile?
Yes! Needle Engine fully supports mobile devices. Your web experiences work on both iOS and Android phones and tablets – no app required. Users simply open a URL in their mobile browser.
Mobile features include:
- Full 3D rendering on mobile browsers (Chrome, Safari, Firefox, etc.)
- Touch input support out of the box
- Mobile AR on Android (WebXR) and iOS (WebXR via App Clips + USDZ/QuickLook)
- Responsive design – adapt your layout to different screen sizes with responsive design tools
- Automatic optimization ensures fast loading even on slower mobile connections
- Everywhere Actions for interactive AR on both iOS and Android
For tips on detecting mobile devices in your scripts, see Detect Mobile Devices. For debugging on mobile, see the Debugging Guide.
Does it work on Quest / Pico?
Yes! Needle Engine supports VR headsets like Meta Quest and Pico out of the box via WebXR. Users open your experience in the headset's browser – no app store, no installation required.
Supported VR headsets include:
- Meta Quest (Quest 2, Quest 3, Quest Pro)
- Pico (Pico 4, Pico Neo)
- Apple Vision Pro
- HTC Vive, Valve Index, and other PC VR headsets
- Future devices that support WebXR will work automatically
To enable VR, simply add the WebXR component to your scene. See the VR & AR (WebXR) guide for details.
Does it work on Apple Vision Pro?
Yes! Apple Vision Pro is fully supported for immersive VR via WebXR, including hand tracking and eye+pinch input. The same scene you build for Meta Quest runs on Vision Pro — no separate codebase, no app store.
For interactive passthrough (AR) on Vision Pro, use Everywhere Actions — Needle Engine generates interactive USDZ files dynamically that play back in QuickLook on visionOS. WebXR immersive-ar is not available on visionOS at the moment — this is a platform limitation set by Apple, and affects every WebXR engine. Needle Engine's Everywhere Actions fill that gap with animations, material changes, spatial audio, and tap interactions in passthrough.
What works today on Vision Pro:
- Immersive VR via WebXR — works in Safari on visionOS 2+ out of the box (no flags needed). Add the
WebXRcomponent to your scene and the VR button appears. - Hand tracking and transient pointer input (eye+pinch) are supported natively.
- Interactive passthrough via Everywhere Actions — animations, material changes, spatial audio, and tap interactions all play back in QuickLook on visionOS.
- Picking up and manipulating virtual objects, physics, networking, and the rest of the engine feature set all work the same way they do on Quest in VR mode.
Recommended approach for a cross-platform Quest + Vision Pro app:
- For shared VR experiences (full immersion, hand tracking, multiplayer), build once with Needle Engine and ship to both Quest and Vision Pro via WebXR — same scene, same code.
- If your app needs passthrough on Vision Pro, use Everywhere Actions for the Vision Pro path and WebXR passthrough for the Quest path. The same scene can target both.
See WebXR device support for the full feature matrix.
Does it work on iOS?
Yes! Needle Engine works on iOS in two ways:
3D in the browser – Your web experiences run in Safari, Chrome, and other iOS browsers just like on any other platform. Touch input, responsive layout, and all engine features work out of the box.
AR on iOS – Needle Engine offers two approaches for AR on iOS:
- Native WebXR via App Clips – Full WebXR AR powered by ARKit, no app install needed. Users scan a QR code or tap a link to enter AR instantly.
- USDZ / QuickLook – Use Everywhere Actions for interactive AR experiences using Apple's built-in QuickLook viewer.
How does AR on iOS work?
Safari on iOS doesn't support WebXR natively. Needle Engine bridges this gap using Needle Go, an App Clip that runs your WebXR scene on top of native ARKit. When a user taps "Enter AR", iOS launches the App Clip on demand (no app install), and the same WebXR scene that runs in Chrome on Android runs inside it. The App Clip is essentially a lightweight browser/runtime that adds the WebXR API to iOS.
Does iOS AR need manual setup or an Apple Developer account?
No. You don't need an Apple Developer account, and you don't build or publish your own App Clip. All iOS AR experiences run through Needle's shared Needle Go App Clip — your existing scene just loads inside it, with no project changes. Simply make sure your scene has a WebXR component with createARButton enabled and is deployed to a public HTTPS URL (the same setup that works on Android).
iOS AR works on any plan, including the free tier, with default Needle branding. A PRO subscription is only needed if you want to customize the App Clip splash screen.
Does it work on Android?
Yes! Needle Engine fully supports Android devices:
- 3D in the browser – Works in Chrome, Firefox, Samsung Internet, and other Android browsers with full touch support.
- AR on Android – Android has native WebXR support in Chrome. Add the
WebXRcomponent to your scene and users can enter AR directly from the browser – no app required.
See the VR & AR (WebXR) guide for setup instructions.
Does my machine support WebGL 2?
Use a detector like this one to determine if your device supports WebGL 2, it also hints at what could be the cause of your problem, but generally make sure you have updated your browser and drivers. WebGL 1 is not supported.
Known devices to cause issues:
- Lenovo Thinkpad - T495
WebXR
My website doesn't have AR/VR buttons
- Make sure to add the
WebXRcomponent somewhere inside your rootGltfObject. - Optionally add a
AR Session Rootcomponent on your rootGltfObjector within the child hierarchy to specify placement, scale and orientation for WebXR. - Optionally add a
XR Rigcomponent to control where users start in VR
I can't enter AR mode on my Android device
If you see "WebXR not found" or simply can't enter AR, check the following:
- Device compatibility: Your device must support ARCore. Not all Android devices do.
createARButtonis enabled: Make sure theWebXRcomponent in your scene has thecreateARButtonoption enabled.- Test with a known-working sample: Try the Immersive AR sample on the same device. If it works there, the issue is in your scene setup; if it doesn't, your device likely doesn't support WebXR AR.
- Use Chrome: WebXR AR on Android requires Chrome. Other browsers may not support it.
For AR on iOS, Needle Engine supports WebXR via App Clips (Needle Go). See also the Platform Support section.
AR/VR doesn't work in an iframe (console shows "xr-spatial-tracking is not allowed in this document")
WebXR is gated by the xr-spatial-tracking permission policy. When your scene runs inside an <iframe>, the embedding page must grant it — having the feature on your own page is not enough. Both of these must be true:
- The
<iframe>lists it in itsallowattribute:<iframe src="https://your-app…" allow="xr; xr-spatial-tracking; fullscreen"></iframe> - The page containing the iframe is itself permitted the feature — the
allowattribute only delegates a feature the parent already has. If the parent page sends a restrictivePermissions-Policyheader that omitsxr-spatial-tracking, the iframe can't receive it.
This is about the document's permission policy, not the device's capability, so the violation can appear even on a headset like Quest. When the policy isn't granted, the engine reports XR as unsupported (and from Needle Engine 5.1.x it does so quietly instead of repeating the violation in the console).
See iframe allow attribute and the Embedding guide.
How do I access the tracked object from an image tracking event?
Each WebXRTrackedImage received from the image-tracking event gives you access to the assigned 3D object via img.model.object:
Tips
The event.detail.trackedImages event shape and img.trackedModel shorthand are available in the current Needle Engine 5.1 alpha and will be part of Needle Engine 5.1.x. If you're using an older engine version, update to the 5.1 alpha or newer.
tracker.addEventListener("image-tracking", event => {
    for (const img of event.detail.trackedImages) {
        // Access the assigned AssetReference
        const obj = img.model.object;
        // From Needle Engine 5.1+ you can also use: img.trackedModel
    }
});
See the Scripting Image Tracking guide for more details.
AI
How do I use AI to help me build with Needle Engine?
See the AI Assistant & Tools page for the full guide, including:
- Needle MCP Server — connect Claude Desktop, Cursor, VS Code Copilot, and more to your live 3D scenes
- Needle Engine Skill — install with
npx skills add needle-tools/ai(works with Claude Code, Cursor, Copilot, and more) - llms.txt — compact reference for local models (Ollama, etc.)
- llms-full.txt — complete documentation
The Needle Inspector Chrome extension doesn't show any tools in my AI assistant
If you're using the Needle Inspector Chrome extension and the live scene tools (e.g. selecting objects, reading scene data) don't appear in your AI assistant's tool list, make sure the Needle MCP server is running locally. The Chrome extension connects to the local MCP server at localhost:8424 — without it, the Inspector tools won't be available to your AI assistant.
Start the local MCP server with:
npx needle-cloud startIf you're using Needle Engine for Unity or Blender, the local server is usually already running — the editor integrations start it automatically. See the AI Assistant & Tools page for setup instructions for Claude Code, Cursor, VS Code Copilot, and other tools.
What is the difference between needle-cloud start and needle-cloud mcp?
These commands serve different purposes:
npx needle-cloud start(alias:start-server) — Starts the local Needle Cloud server onlocalhost:8424. This handles license validation, provides MCP tools for AI assistants, and acts as the bridge for the Needle Inspector Chrome extension. If you're using Unity or Blender, this server is usually started automatically by the editor integration. In standalone web projects or CI/CD pipelines, run this manually before your build command.npx needle-cloud mcp— Runs the MCP server in stdio mode instead of HTTP. Your AI client spawns the process directly — no persistent server needed. Use this when configuring MCP in tools like Claude Desktop or Cursor viamcpServersconfig. The stdio transport also proxies to the HTTP server when it's running, so ifstartis active and the Needle Inspector Chrome extension is connected, Inspector tools become available through stdio as well.
See the Needle MCP Server documentation for more details.
How do I keep cloud AI from accessing my local machine?
Run npx needle-cloud settings remote-ai-tools false to keep your files fully local — you stay in full control of what the AI can touch, with zero project data leaving your machine. Perfect for sensitive projects, client work, and enterprise privacy requirements. Re-enable anytime with true.
Needle Cloud
I got an error from Needle Cloud (upload, optimization, deployment, ...) — what should I do?
If anything goes wrong with Needle Cloud — an asset fails to upload, optimization fails, a deployment errors out, or you see any other unexpected error — please report it. We typically fix cloud-side issues within a few hours to a day.
The fastest way to report is directly from the window where the error appeared:
- Click the Report button next to the error. This sends us the relevant logs so we can investigate without needing additional info from you.
- Alternatively, email us at hi@needle.tools with a short description of what you were doing and any error message you saw.
About tokens used for failed jobs: if optimization tokens were consumed for a job that failed due to a cloud-side error, we'll refund them. Just mention it in your report or email and we'll credit them back to your team.
For ongoing service status, check status.needle.tools.
What do the "tags" on Needle Cloud deployments do?
When you set tags on a Needle Cloud deployment, they are written as <meta name="keywords"> in the HTML of your deployed site (if no keywords meta tag already exists). This has two main uses:
- SEO — Search engines can use meta keywords to understand your page's topics, improving discoverability.
- Google Analytics — You can use these meta keywords as a custom dimension in GA4. In Google Tag Manager, create a "DOM Element" variable that reads the
contentattribute frommeta[name="keywords"], then send it as a parameter with your GA4 page view tag. This lets you filter and segment analytics by the tags you set in Needle Cloud.
Needle Cloud also automatically sets <meta name="description">, Open Graph tags (og:title, og:description, og:image), and Twitter Card tags for your deployments — if your page doesn't already define them. This improves how your links appear in search results and when shared on social media or messaging apps.
Does Needle Engine support accessibility and screen readers?
Yes. Needle Engine includes a built-in AccessibilityManager that creates a visually-hidden ARIA overlay mirroring interactive 3D objects. Several built-in components register accessible elements automatically:
- DragControls — announces draggable objects and drag state
- Button — exposes UI buttons to the accessibility tree
- Text — exposes UI text content to screen readers
- Everywhere Actions (ChangeTransformOnClick, ChangeMaterialOnClick, PlayAnimationOnClick, PlayAudioOnClick, EmphasizeOnClick) — announces clickable interactions
Hovering over interactive objects announces them to screen readers via an ARIA live region. Custom components can participate by calling this.context.accessibility.updateElement(), .focus(), and .hover().
My embedded scene shows "Refused to display … because it set 'X-Frame-Options' to 'sameorigin'"
X-Frame-Options (and its modern successor, the Content-Security-Policy frame-ancestors directive) is a response header sent by the page inside the <iframe> that controls which sites are allowed to frame it. When the embedding site isn't permitted, the browser refuses to render the frame and the embed stays blank:
Refused to display 'https://…' in a frame because it set
'X-Frame-Options' to 'deny'.
On Needle Cloud, cross-site embedding is a licensed feature. Deployments from a team without a commercial Needle Engine license (i.e. the free/Basic tier) are served with anti-clickjacking headers:
X-Frame-Options: DENY
Content-Security-Policy: frame-ancestors 'self' https://*.needle.tools
That means a free-tier deployment (e.g. a *.needle.run URL) can only be framed on Needle's own domains — embedding it on your own website is blocked. Deployments from a team with an EDU, Pro, or Enterprise license send no such header and can be embedded anywhere, including on a custom domain.
How to fix it:
- Embed your Needle Cloud deployment on your own site → use a licensed team. Deploy from a team that holds an EDU, Pro, or Enterprise license. Those deployments aren't sent the framing restriction, so they embed cross-origin out of the box. See Pricing.
- Free tier / quick sharing: embed the scene from Needle's own domain instead. The Needle Cloud viewer embed (
https://cloud.needle.tools/view/embed?file=…, via the asset's Embed button) is allowed byframe-ancestors. See Needle Cloud iframe. - Self-hosting your build: a production
dist/build you host yourself sends noX-Frame-Optionsat all, so it frames anywhere. If embeds are still refused, a proxy, CDN, or host in front of it (Cloudflare, nginx, Apache, IIS, or a CMS/security plugin) is injecting the header — remove that rule, or replace it withframe-ancestors 'self' https://embedding-site.comto allowlist the embedding domain. - Check you're framing the scene, not a wrapper page — a login screen, redirect target, or CMS admin page in front of the content can carry its own
X-Frame-Options. Inspect the failed URL in DevTools → Network.
Prefer an inline embed? If the scene should be part of the page rather than inside a frame, use <needle-app>, which runs in the host document and isn't affected by X-Frame-Options at all.
Once the frame loads, see AR/VR doesn't work in an iframe for the related WebXR xr-spatial-tracking permission policy, which governs whether AR/VR runs inside the frame.