Exporting to glTF
Export your 3D content from Unity and Blender to web-optimized glTF format.
What you can export:
- 🎨 Materials (PBR, custom shaders, MaterialX)
- 🎬 Animations (Timeline, Animator, clips)
- 📦 Scenes and prefabs (for lazy loading)
- 💡 Lightmaps and skyboxes
- 🎭 Meshes, textures, and more
 Quick Start
Unity
Add a Needle Engine component to your scene to get started. By default, your entire scene exports automatically on save.
Export Scope
Default behavior: Your entire scene exports as a glTF file to the assets/ folder, including any assets referenced in components.
Optional - Use GltfObject to limit scope: Add a GltfObject component to export only that GameObject and its children. Content outside GltfObject roots is ignored.
Advanced - Nested GltfObject for deferred loading: Nest GltfObject components to defer loading—child glTFs only load when the parent becomes active.
- See: Hotspot sample
- Note: Cross-references between nested GltfObjects not supported
Settings
Exclude from export: Tag objects as EditorOnly to exclude them and their children.
Performance:
- Smart Export -
Edit > Project Settings > Needle- Only export on change - Auto Compression -
CompressionSettingscomponent added automatically toNeedle Engine
Scene Structure & Loading
Multiple Scenes & Lazy Loading
Split your app into multiple scenes for faster loading. Use the SceneSwitcher component to load and unload scenes at runtime.
Benefits:
- Smaller initial load times
- Load content only when needed
- Better performance on all devices
Example: needle.tools loads each section as a separate scene on demand.
Recommended File Sizes
Keep glTF files within these limits for optimal performance:
| Metric | Recommended Max | Notes |
|---|---|---|
| File Size | 50 MB uncompressed | Usually compresses to 10-20 MB |
| Vertices | 500k | Lower for mobile VR |
| Lightmaps | 4× 2k textures | Larger = slower loading |
Optimization Tools
- Needle Compression - Powerful automatic texture and mesh compression (enabled by default via Auto Compression component)
- Progressive Loading - gltf-progressive loads assets progressively for faster perceived load times
- Split Large Scenes - Split content using
GltfObject,SceneSwitcher, or custom components with prefab/scene references (works in Unity and Blender)
Compression & Loading Comparison:
Key difference: Traditional compression requires downloading the entire file before display. Needle's progressive loading shows content immediately while quality improves in the background.
Learn more:
- Progressive Loading - Technical details and implementation
- Optimization & Compression - Texture/mesh compression settings
- Compression Examples - Real-world file size comparisons
Scene Assets (Unity & Blender)
Reference other scenes from your scripts to export them as separate glTF files. Works with both Unity scenes and Blender scenes.
Unity: Use UnityEditor.SceneAsset fields in your components. Referenced scenes export as separate glTF files and can be loaded as AssetReference from TypeScript.
Blender: When you reference a Blender scene from a component, it exports as a separate glTF file automatically.
Hot Reload: When working in a referenced scene, changes are detected and only that scene re-exports automatically.
Example: On needle.tools, each section is set up as a separate scene and exported into multiple glTF files that load on demand:

Prefabs (Unity only)
Export Unity prefabs as individual glTF files by referencing them from your scripts using AssetReference:
import { Behaviour, serializable, AssetReference } from "@needle-tools/engine";

export class MyClass extends Behaviour {

    // if you export a prefab or scene as a reference from Unity you'll get a path to that asset
    // which you can de-serialize to AssetReference for convenient loading
    @serializable(AssetReference)
    myPrefab?: AssetReference;

    async start() {
      // directly instantiate
      const myInstance = await this.myPrefab?.instantiate();

      // you can also just load and instantiate later
      // const myInstance = await this.myPrefab.loadAssetAsync();
      // this.gameObject.add(myInstance)
      // this is useful if you know that you want to load this asset only once because it will not create a copy
      // since ``instantiate()`` does create a copy of the asset after loading it
    }
}
Prefab nesting is supported—referenced prefabs are also exported automatically.
How to Export Animations
Needle Engine supports a powerful subset of animation features:
Supported:
- Timeline - Activation tracks, animation tracks, track offsets
- Animator - Top-level state transitions
- Animation Clips - All loop modes
- Procedural Animations - Via scripting
Limitations:
- Blend trees not supported
- Sub state machines not supported
- Materials won't be duplicated on export (split materials manually if needed)
Advanced Animation Support
Needle Engine supports KHR_ANIMATION_POINTER, allowing animation of almost all properties including script variables.
How to Export Materials
Physically Based Materials (PBR)
Materials are automatically converted to glTF PBR materials on export.
Recommended shaders (best control):
- UnityGLTF/PBRGraph ⭐ - Full PBR features (clearcoat, sheen, iridescence, transmission, refraction, dispersion)
- UnityGLTF/UnlitGraph - Unlit materials
Supported with conversion:
- Universal Render Pipeline/Lit
- Universal Render Pipeline/Unlit
- Standard (Built-in)
- Autodesk Interactive (Built-in)
- Unlit (Built-in)
Other materials are converted using property name heuristics.
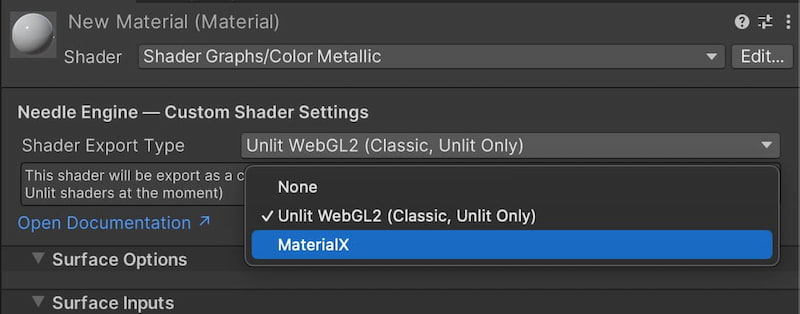
Custom Shaders
Export custom shaders in two formats:
MaterialX Format (Recommended)
MaterialX is a standard for describing materials in a graph-based way, independent of the rendering engine.
WebGL2 Format
Export custom unlit shaders directly as WebGL2 code.
Limitations:
- Only unlit shaders officially supported
- Lit shaders experimental (limited rendering modes)
- No shadow receiving on custom shaders
- Skinned meshes not supported
- Coordinate system differences may require adjustments (UV origin, X-axis flips)
To export: Use the dropdown in the Material header to select shader export type.
How to Export Skybox
Skyboxes and environment reflections are automatically baked and exported.
 Unity Skybox
The Unity skybox and custom reflection are automatically baked and exported.
Customize:
- Change resolution: Add a
SkyboxExportSettingscomponent to your scene - Disable export: Untick
Embed Skyboxon yourGltfObjectcomponent
 Blender Skybox
Blender world environment is automatically exported as skybox.
Learn more about Blender export →
How to Export Lightmaps

Lightmaps baked in your 3D editor are automatically exported. The lighting you see in your editor is what you get on the web!
Supported:
- Unity's built-in lightmapper and third-party solutions
- Blender's Cycles renderer with baked lighting
Platform-Specific Guides
Unity
- Unity Lightmapping - Settings and best practices
Blender
- Blender Lightmapping - Baking in Blender