Lightmapping
Bake realistic lighting and shadows directly in Blender and export them to the web for stunning visuals with excellent performance.
What is Lightmapping?
Lightmapping is the process of pre-calculating lighting and baking it into textures. This gives you:
Benefits:
- ✨ Photorealistic lighting - Bake complex lighting calculations once
- ⚡ Great performance - No real-time lighting calculations needed
- 🎨 Artistic control - Fine-tune lighting in Blender
- 📦 Small file sizes - Compressed lightmap textures
- 🔄 Multiple instances - Each instance can have unique lightmaps
Use Cases:
- Architectural visualization
- Product showcases with dramatic lighting
- Art galleries and museum experiences
- Any scene with static lighting
Requirements
Before you start:
- At least one light in your scene
- Objects marked as
Lightmappedin the Needle Object panel - Blender's lighting set up the way you want it
Download Example
Get the complete lightmapping example to learn from: lightmaps.blend
Quick Start
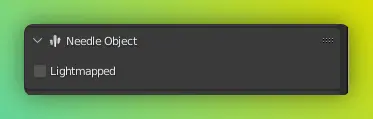
Step 1: Mark Objects for Lightmapping
For Mesh & Light Objects:
- Select your object
- Open the Needle Object panel (right Viewport Sidebar)
- Enable the
Lightmappedcheckbox
What to Lightmap
- Mark static geometry (buildings, furniture, environments)
- Mark lights that should affect lightmaps
- Don't mark dynamic objects that move
Use Lightmap Scale to control how much texel space an object occupies in the final lightmap. Large objects with simple lighting can often use a lower scale to save texture space.
Step 2: Configure Settings
Open the Needle Engine panel (right Viewport Sidebar) and toggle the Lightmap Preview button to activate lightmaps.
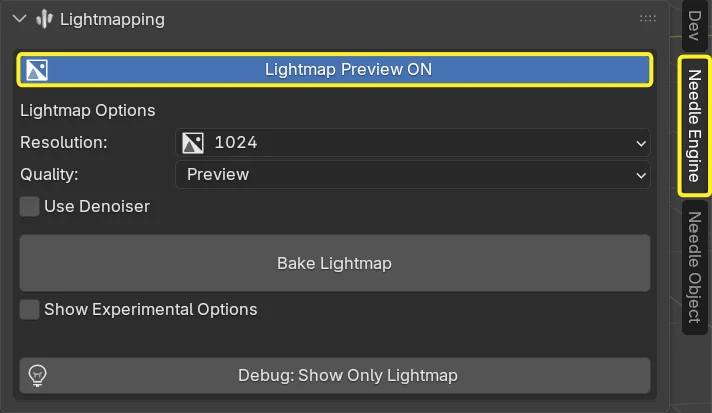
Here you can adjust the resolution and baking quality of the final lightmap texture. Baking many objects can take a while, so for quick previews of your lighting setup, use Preview quality with a low resolution like 512.
To inspect the lightmap baking result, click Debug: Show Only Lightmap to display only the lightmap texture on your objects instead of the full material.
Step 3: Bake Lightmaps
- Click the Bake Lightmap button
- Wait for baking to complete
- Lightmaps are automatically exported with your scene
For Lightmap baking, we use the Cycles renderer. So configure your Cycles Render Device in Blender Preferences → System for a much faster baking process.
- OptiX for NVIDIA GPUs
- HIP for AMD GPUs
- oneAPI for Intel GPUs
What Happens:
- Needle Engine generates lightmap UVs automatically (no manual UV unwrapping needed!)
- Blender bakes lighting into textures
- Textures are saved in your project
- Export includes lightmap data
Lightmap Settings Explained
Lightmap Texture Resolution
Resolution
- Texture resolution of the baked lightmap
- Higher = better quality, larger files
- Lower = faster baking, smaller files
- Recommended: 1024-4096 (based on the scene size)
Quality
Samples - Render samples for baking
- More samples = cleaner results, slower baking
- Fewer samples = faster but noisier
- Recommended: 128-512 for production
Use Denoiser - Remove noise from baked lightmaps
- Enable for cleaner results
- Requires Blender's denoiser
Automatic UV Generation
Needle Engine's lightmapping plugin automatically generates lightmap UVs - no manual unwrapping required!
How it works:
- Analyzes your geometry
- Creates optimal UV layouts
- Packs efficiently into texture space
- Handles multiple instances intelligently
This means:
- ✅ No second UV channel needed
- ✅ Works with complex models
- ✅ Supports instanced objects with unique lighting
Best Practices
Scene Setup
Lighting:
- Use area lights for soft, natural lighting
- Combine sun light with fill lights for outdoor scenes
- Add rim lights to highlight edges
- Consider color temperature (warm/cool)
Geometry:
- Ensure clean topology (no overlapping faces)
- Lightmap static architecture, not characters
- Use separate objects for elements that need different lightmap resolution
Performance:
- Only lightmap objects that benefit from it
- Use lower resolution for background elements
- Compress textures in production builds
Troubleshooting
Black or dark lightmaps:
- Check that lights are marked as
Lightmapped - Increase render samples
- Verify normals are correct (consistent face orientation)
Seams or artifacts:
- Check for overlapping UV islands
- Ensure geometry is watertight (no gaps)
Too slow:
- Reduce lightmap resolution
- Reduce render samples
- Baking many objects can be slow — consider combining objects where possible
- Bake in sections (bake one object at a time)
File too large:
- Lower lightmap resolution
- Reduce
Lightmap Resolution - Enable texture compression in production builds
Workflow Tips
Iterative Baking
While developing:
- Use lower resolution and fewer samples for fast iteration
- Mark only key objects as lightmapped initially
- Test in browser frequently
- Increase quality for final bake
Combining with Real-Time Lighting
You can mix lightmaps with dynamic lights:
- Use lightmaps for static ambient lighting
- Add dynamic point lights for moving elements
- Result: Beautiful base lighting + interactive highlights
Multiple Lightmap Scenarios
Bake different lighting conditions:
- Day/night versions
- Different seasons
- Dramatic vs. natural lighting
- Switch between them at runtime
Exporting Lightmaps
Lightmaps are exported automatically when you:
- Save your
.blendfile (if auto-export is enabled) - Click
Exportin the Needle Project panel - Run
Build: Production
Output:
- Lightmap textures saved in your project's
assetsfolder - GLB file includes lightmap data
- Ready to use on the web - no additional setup needed
Advanced: Runtime Control
You can control lightmaps from TypeScript:
import { Behaviour, Renderer } from "@needle-tools/engine";

export class LightmapSwitcher extends Behaviour {

    switchToNightLightmaps() {
        const renderers = this.gameObject.getComponentsInChildren(Renderer);
        for (const renderer of renderers) {
            // Access and modify lightmap data
            // (specific API depends on your setup)
        }
    }
}
Experimental Feature Notice
Lightmapping is Experimental
The lightmapping plugin is currently experimental. We recommend:
- Creating backups of your
.blendfiles before baking - Testing thoroughly before production use
- Reporting issues you encounter
Your feedback helps us improve the feature!
Next Steps
- Texture Compression - Optimize lightmap file sizes
- Deployment Guide - Publish your lightmapped scenes
- Components Overview - Add interactivity to lit scenes
Need Help?
- Discord Community - Ask about lightmapping workflows
- Forum - Share your lightmapped scenes
- Download Example - Working lightmap sample