Upload glTF to Needle Cloud
Publish your Blender scene as a 3D asset on Needle Cloud directly from the export menu — no local web project required. Your scene is exported as a glTF, uploaded, automatically compressed and hosted for you. From there you can configure it in the Needle Cloud 3D viewer, share it with a link, embed it on any website, or load it in any web project built with Needle Engine or three.js.
Needle Engine components you added to your objects — like OrbitControls or animations — are exported as part of the asset too.
Fastest way from Blender to the web
This is the quickest way to get a model online. When you want a full interactive web app with hot reload, custom code and deployment options, create a web project instead — both workflows work side by side.
Upload your scene
In Blender, open File > Export > Upload glTF to Needle Cloud
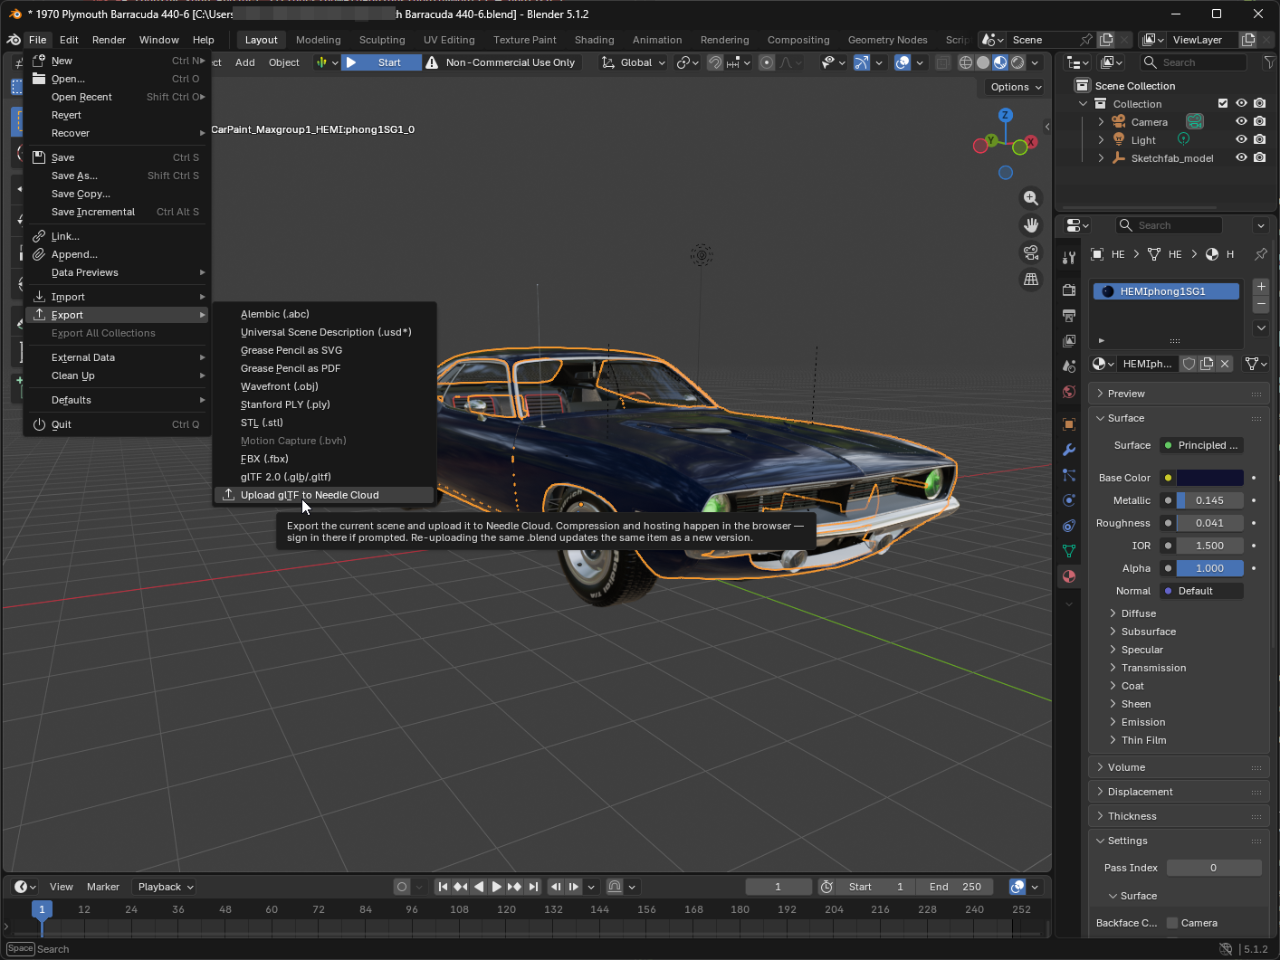
Your browser opens and hands the exported file to Needle Cloud. Sign in (or create a free account) when prompted — upload, compression and hosting all happen right there.
When the upload finishes, your new asset opens in Needle Cloud, ready to be configured and shared.
That's it — your whole scene is now an optimized, versioned 3D asset on Needle Cloud.
Allow pop-ups once
The upload opens Needle Cloud in a pop-up window. If your browser blocks it, click Continue to Needle Cloud on the page and allow pop-ups — future uploads will then run automatically.
Update an asset with new versions
The asset is named after your blend file. When you upload again from a blend file with the same name, the asset gets a new version — no new asset is created. Only the exported glTF is uploaded, never your blend file. This means you can iterate in Blender and upload again, and every link, embed and project that references the asset picks up the update.
Needle Cloud keeps all versions of your asset:
latestalways points to your most recent uploadmainstays on the version you promote, so shared links stay stable while you keep iterating
Learn more about version control and labels.
Save your blend file first
The blend file name is what groups uploads into versions of one asset. An unsaved file uploads as "Untitled" — save it with a proper name first so your asset is named correctly.
Automatic optimization
You upload the raw export — Needle Cloud takes care of making it fast:
- Draco mesh compression
- KTX2 texture compression
- Progressive loading — only what's visible is loaded, in the resolution that's needed
This typically saves 90% or more bandwidth and memory compared to the unoptimized file, with zero setup on your side.
Configure, share and embed
On the asset page in Needle Cloud you can:
- View and configure the asset in the 3D viewer
- Share a link to the viewer or a direct download link
- Embed it on any website — click Embed on the asset's page to get ready-made code for the Needle Cloud viewer, Needle Engine, three.js, react-three-fiber or model-viewer
- Protect it with a password (PRO)
See Cloud Assets for everything you can do with assets on Needle Cloud.
Use the asset in web projects
Uploaded assets are regular glTF files with optimized delivery — you can use them in any web project:
With Needle Engine — load the asset with the Needle Cloud Asset component or point the <needle-engine> web component at the asset URL. See Load 3D assets at runtime for details. Needle Engine components that were exported with the scene work out of the box.
With three.js or react-three-fiber — use the asset's Progressive link together with gltf-progressive to get automatic LODs and progressive texture loading in any three.js scene.
With React, Vue or Svelte — the <needle-engine> web component works in every framework. Follow the dedicated guides for React, Vue and SvelteKit, or see all web framework integrations.
In other tools — download the optimized glTF, or link to it directly. See Use Assets in Your Projects.
Included components
The upload uses the Needle Engine exporter, so components on your objects are included in the glTF. For example, add OrbitControls to your camera before uploading and the asset ships with camera controls that Needle Engine understands — in the viewer and in your own projects.
Deploying full web apps
Uploading a glTF publishes a single asset. To publish a complete interactive web app from Blender — with your own code, custom HTML and a something.needle.run URL — use the Upload to Needle Cloud button in the Needle Engine panel of your web project. See Deploy Your Project and Deploy from Blender.
Getting Help
Discord Community Ask questions and get real-time help from the community.
Forum Detailed discussions and solutions.