Working with Components
Components are the building blocks of interactivity in Needle Engine. Add them to objects in Blender to create interactive behaviors, from simple camera controls to complex game mechanics.
Built-in Components
Needle Engine includes 100+ ready-to-use components for common interactive features.
Adding Components
In Blender:
- Select an object in your scene
- Open the Needle Object panel (Viewport Sidebar)
- Click
Add Component - Search for and select the component you need
- Adjust component settings in the panel
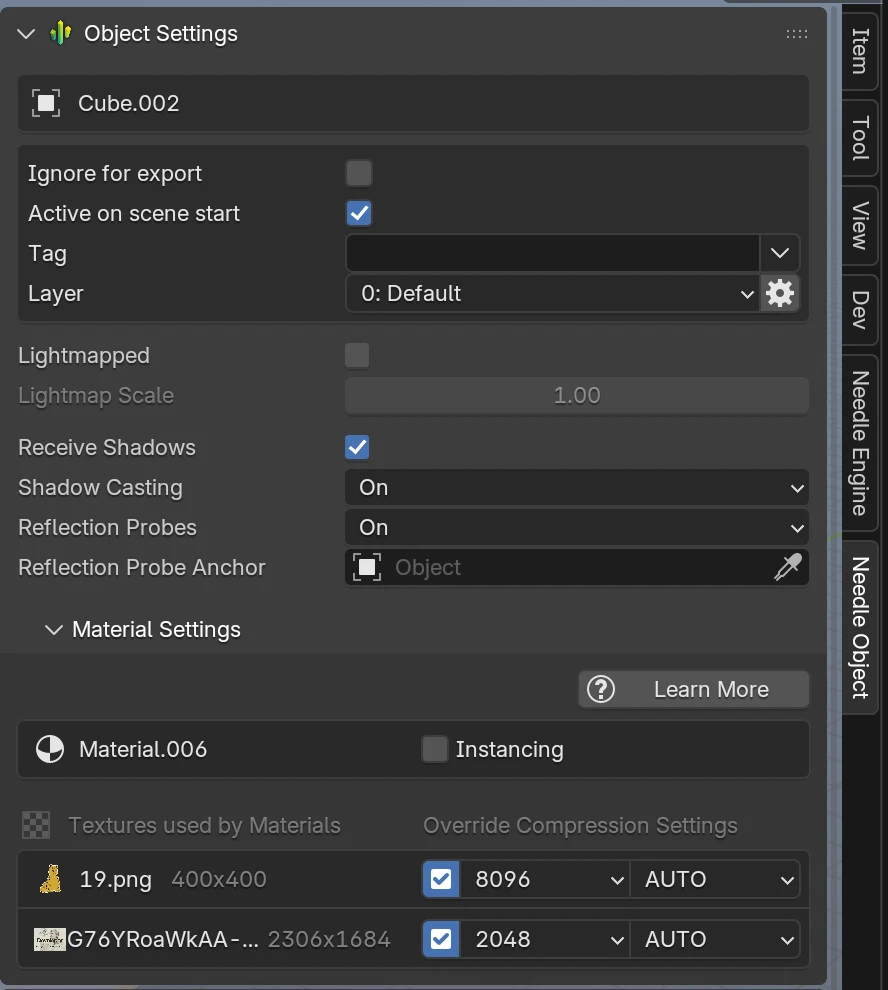
Needle Object Panel
The Needle Object panel is found in the right viewport sidebar under the Needle Object tab. It shows per-object settings like export options, shadow casting, layers, material overrides, and texture compression — as well as the Components section below.

Tips
Component settings appear immediately after adding. Each component has different properties you can configure directly in Blender.
Example: Camera Controls
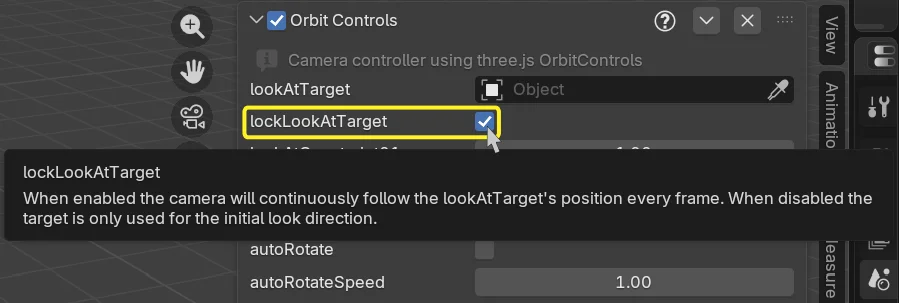
Add OrbitControls to your camera for instant mouse/touch controls on all devices:

OrbitControls settings:
lookAtTarget- What the camera orbits aroundautoRotate- Automatic rotationenableDamping- Smooth camera movementminZoom/maxZoom- Zoom limitsenablePan- Allow panning with right-click- ...
Hover over any property to see its description.
Popular Components by Category
Camera Controls:
OrbitControls- Orbit around a target with mouse/touchViewBox- Ensure content stays framed
Animation:
Animation- Play animation clipsAnimator- State machine animationsPlayableDirector- Timeline-based sequences- Learn more about animation →
Interactivity:
DragControls- Make objects draggable in 3D spaceHoverAnimation- Plays animation on pointer hover enter/exit eventsScrollFollow- Move objects based on scroll positionEverywhereActions- Trigger actions on various events (click, hover, collision, etc.)- Learn more about interactivity →
UI & UX:
Button- Interactive buttons
Multimedia:
VideoPlayer- Play video files and streamsAudioSource- 3D spatial audio
Physics:
Rigidbody- Add physics simulationBoxCollider/SphereCollider/MeshCollider- Collision shapes
Effects:
BloomEffect- Add a glow effect to bright areasDepthOfField- Simulate camera focus blur
XR (Virtual & Augmented Reality):
WebXR- Enable VR/AR with one click- Learn more about WebXR →
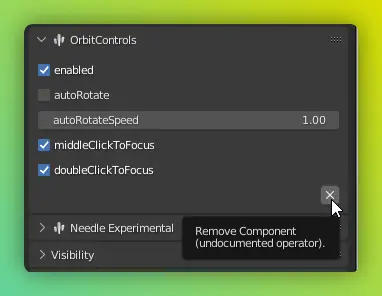
Removing Components
Click the X button in the lower right of any component panel.
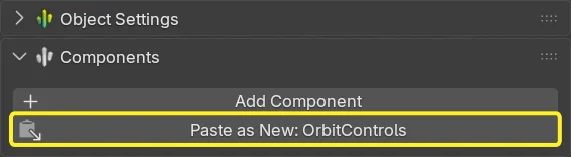
Copy/Paste Components
Click the V button in the lower right of any component panel.
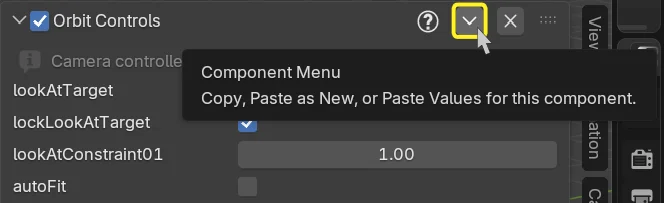
Here you can copy a component along with its configured values.
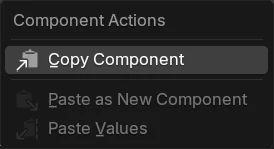
After clicking Copy Component, paste it onto another object with the Paste as New: ... button. Alternatively, to apply values to an existing component of the same type, select Paste Values from the Component Actions menu.
Custom Components
Want behavior that doesn't exist yet? Write your own TypeScript components that automatically appear in Blender.
Use AI to build components faster
Need a custom interaction? Let AI help you build it. With Needle MCP, tools like Claude, Copilot, Cursor, and OpenAI/Codex can inspect existing components on objects, add Needle components, change component properties, move objects, and help debug Blender-to-web workflows with real project context. Connect Needle MCP →
Creating Custom Components
First, make sure you have already generated the web project in the
Needle Enginepanel.
1. Create a new component
Navigate to the Needle Object panel (right Viewport Sidebar) and click the Create New Component button.
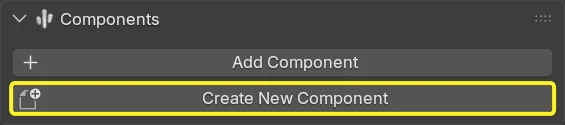
Enter a component name and click Ok. VS Code will automatically open with your web project.
Alternatively:
Click Open Code Editor in the Needle Engine panel to open VS Code with your web project. In your project, navigate to src/scripts/ and create a new .ts file (e.g., RotateObject.ts).
2. Write Your Component
import { Behaviour, serializable } from "@needle-tools/engine";

export class RotateObject extends Behaviour {

    @serializable()
    speed: number = 1;

    @serializable()
    axis: "x" | "y" | "z" = "y";

    update() {
        const delta = this.context.time.deltaTime;
        switch(this.axis) {
            case "x": this.gameObject.rotateX(delta * this.speed); break;
            case "y": this.gameObject.rotateY(delta * this.speed); break;
            case "z": this.gameObject.rotateZ(delta * this.speed); break;
        }
    }
}
3. Save and Use
- Save the file
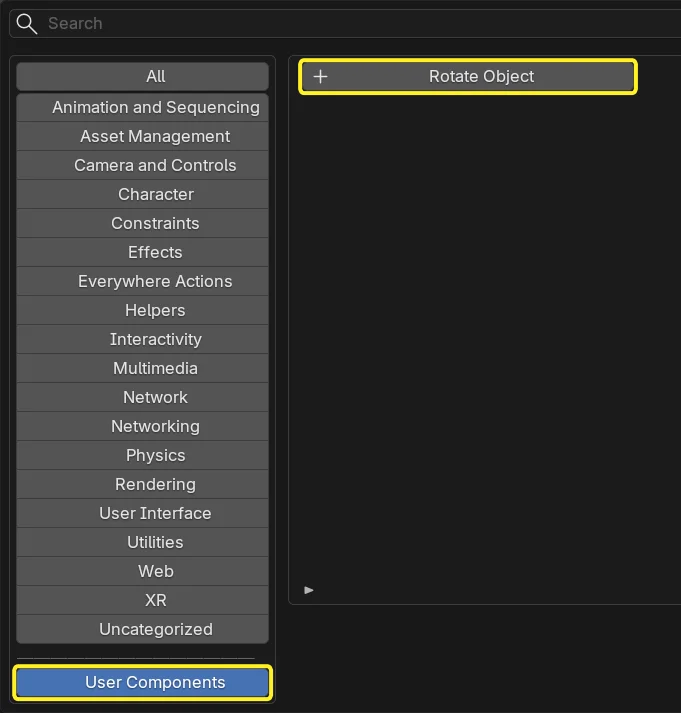
- The component automatically compiles to a Blender panel
- It appears in Blender's component list
- Add it to objects just like built-in components
- Your
@serializable()properties appear as editable fields in Blender
Component Lifecycle
Components have lifecycle methods you can override:
import { Behaviour } from "@needle-tools/engine";

export class MyComponent extends Behaviour {

    // Called once when component is created
    awake() {
        console.log("Component created");
    }

    // Called when component becomes active
    onEnable() {
        console.log("Component enabled");
    }

    // Called every frame
    update() {
        // Your per-frame logic
    }

    // Called when component is disabled
    onDisable() {
        console.log("Component disabled");
    }

    // Called when component is destroyed
    onDestroy() {
        console.log("Component destroyed");
    }
}
Learn more about lifecycle hooks →
Accessing Other Components
For full details, see Creating Components →.
Find components on the same object:
import { Behaviour, Animation } from "@needle-tools/engine";

export class MyComponent extends Behaviour {

    start() {
        // Get a component on this object
        const anim = this.gameObject.getComponent(Animation);
        if (anim) {
            anim.play();
        }
    }
}
Find components in children:
// Get component in any child
const light = this.gameObject.getComponentInChildren(Light);

// Get all components in children
const allLights = this.gameObject.getComponentsInChildren(Light);
Find components in parents:
const canvas = this.gameObject.getComponentInParent(Canvas);Find components anywhere in scene:
import { GameObject } from "@needle-tools/engine";

// Find by name
const player = GameObject.find("Player");

// Find first component of type
const camera = GameObject.findObjectOfType(Camera);

// Find all components of type
const allEnemies = GameObject.findObjectsOfType(Enemy);
Learn more about finding objects and components →
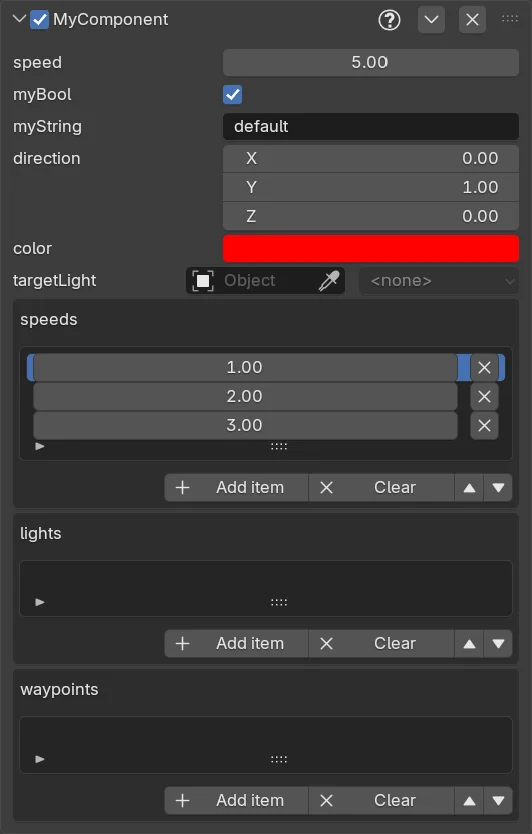
Serializable Properties
Use @serializable() to expose properties in Blender:
import { Behaviour, serializable } from "@needle-tools/engine";
import { Vector3, Color, Light, Object3D } from "three";

export class MyComponent extends Behaviour {

    // Basic types
    @serializable()
    speed: number = 5;

    @serializable()
    myBool: boolean = true;

    @serializable()
    myString: string = "Default";

    // Three.js types
    @serializable(Vector3)
    direction: Vector3 = new Vector3(0, 1, 0);

    @serializable(Color)
    color: Color = new Color(1, 0, 0);

    // References to other components
    @serializable(Light)
    targetLight?: Light;

    // Arrays with primitives (number, string, boolean)
    @serializable()
    speeds: number[] = [1, 2, 3];

    // Arrays with object references need the type specified
    @serializable(Light)
    lights: Light[] = [];

    @serializable(Object3D) // type refers to the array element type
    waypoints: Object3D[] = [];
}
All these properties become editable in Blender's component panel!
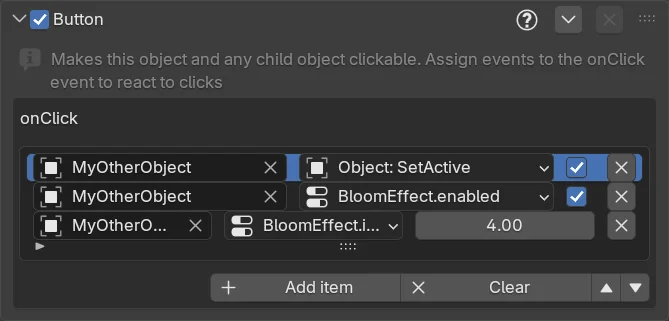
Component Communication
Using Events:
import { Behaviour, EventList, PointerEventData, serializable } from "@needle-tools/engine";

export class Button extends Behaviour {

    @serializable(EventList)
    onClick: EventList = new EventList(); // Can assign in Blender!

    onPointerClick() {
        this.onClick.invoke();
    }
}

export class Door extends Behaviour {

    open() {
        console.log("Door opening!");
        // Animation logic here
    }
}
In Blender, assign the Door's open() method to the Button's onClick event.
Tips
EventLists are powerful! They can also toggle object active states, enable/disable components, and change property values on other components.
Direct References:
export class PlayerController extends Behaviour {

    @serializable(Animator)
    animator?: Animator;

    jump() {
        this.animator?.setTrigger("jump");
    }
}
Assign the animator reference in Blender by dragging the component.
Best Practices
Component Design:
- Keep components small and focused (single responsibility)
- Use
@serializable()for values artists should control - Provide sensible defaults
- Add comments to explain parameters
Performance:
- Avoid heavy calculations in
update()- useonEnable()when possible - Cache component references in
awake()orstart() - Use object pooling for frequently created/destroyed objects
Organization:
- Group related components in the same file or folder
- Use clear, descriptive class names
- Follow TypeScript naming conventions
Next Steps
- Create Components Guide - Detailed scripting tutorial
- Component API Reference - Complete API documentation
- Animation Workflows - Use animation components
- TypeScript Essentials - Learn TypeScript basics
Need Help?
- Discord Community - Ask about component development
- Forum - Share your custom components
- Component Catalog - Browse all built-in components