Animation Workflows
Needle Engine offers multiple ways to animate your 3D content on the web, from simple playback to complex state machines and timeline-based sequences.
Simple Animation Component
For basic animation playback, use the Animation component.
When to use:
- Single animations that play on load
- Simple triggered animations
- Sequential animation clips
Setup:
- Select your animated object in Blender
- Add an
Animationcomponent (Needle Components panel) - Assign your animation clip
- Enable
playAutomaticallyto start on load
Multiple Clips
Add additional clips to the clips array. By default, only the first clip plays automatically. Trigger others using custom TypeScript or UI buttons.
AnimatorController - State Machine Animations
For complex character animations or interactive state-based systems, use the AnimatorController.
State machine animations for complex character control
When to use:
- Character controllers with multiple states (idle, walk, run, jump)
- Interactive objects with different behaviors
- Complex animation blending and transitions
- Game-like mechanics
What is an AnimatorController?
- A visual state machine graph for managing animation transitions
- Define multiple animation states and conditions for switching between them
- Configure blend times and transition rules
- Perfect for character controllers, interactive objects, and game mechanics
Creating an AnimatorController
1. Open the Editor
Use the Editor Type dropdown (top left of any panel) and select AnimatorController.

2. Create or Select an Asset
Click + to create a new AnimatorController or select from existing assets.
Understanding the Graph
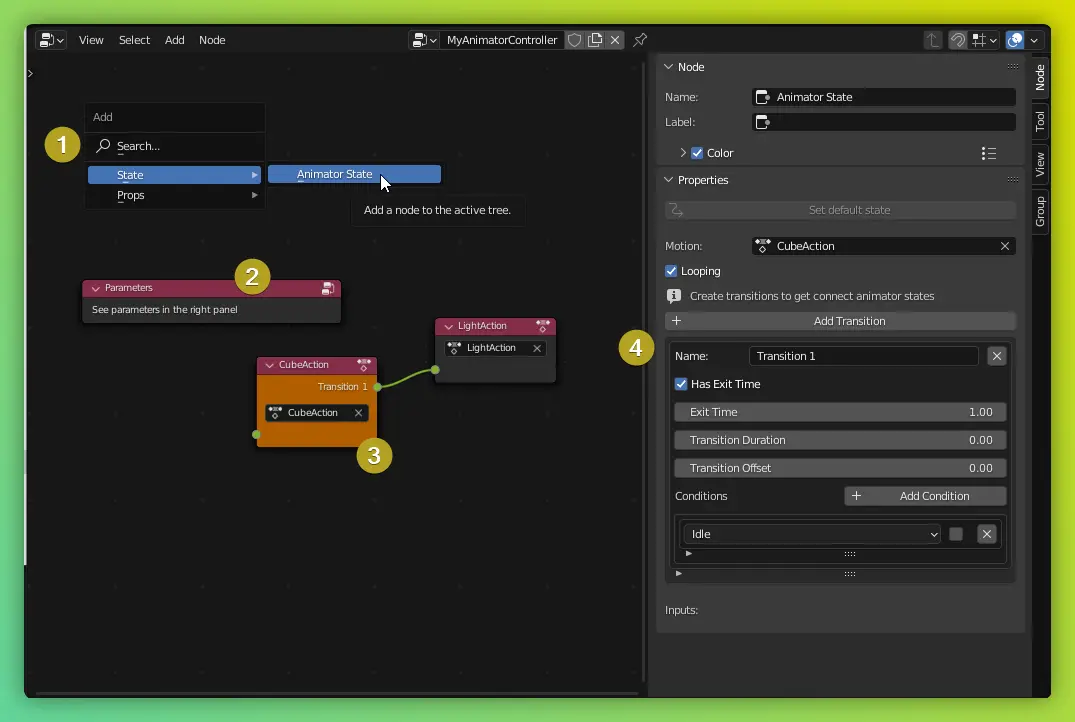
Graph Elements:
- Create States - Press
Shift+Ato add new animation states - Parameters Node - Appears automatically; defines conditions for transitions
- Animation States - Orange state is the starting state (change via Properties panel)
- Transitions - Configure in the Properties panel with conditions and blend settings
Workflow:
- Create states for each animation (idle, walk, run, etc.)
- Add parameters (bool, float, int, trigger) to control transitions
- Connect states with transitions
- Set conditions for when transitions should occur
- Configure blend times for smooth transitions
Using Your AnimatorController
In Blender:
- Add an
Animatorcomponent to the root of your animated object - Assign your AnimatorController asset to the component

Controlling from Code:
import { Animator } from "@needle-tools/engine";

// Get the Animator component
const animator = this.gameObject.getComponent(Animator);

// Set parameters to trigger transitions
animator.setBool("isWalking", true);
animator.setFloat("speed", 2.5);
animator.setTrigger("jump");
Controlling from UI:
Use Button components to set animator parameters without code. In the button's onClick event, select your Animator and choose which parameter to set.
PlayableDirector - Timeline Animation
Export Blender's NLA Tracks (Non-Linear Animation) directly to the web using the PlayableDirector component.
When to use:
- Cinematic sequences
- Scroll-driven storytelling
- Coordinated multi-object animations
- Timeline-based interactive experiences
- Complex choreographed scenes
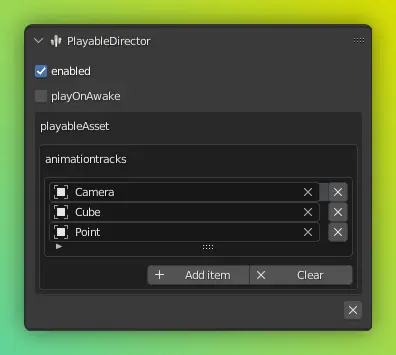
Setup:
- Create NLA tracks in Blender for your animated objects
- Add a
PlayableDirectorcomponent to any object - In the component settings, add objects to the
animation trackslist - Needle Engine exports those objects' NLA tracks

Controlling Timeline Playback
From Code:
import { PlayableDirector } from "@needle-tools/engine";

// Get the PlayableDirector
const timeline = this.gameObject.getComponent(PlayableDirector);

// Control playback
timeline.play();
timeline.pause();
timeline.stop();

// Jump to specific time
timeline.time = 5.0; // seconds

// Evaluate at current time
timeline.evaluate();
Example: Scroll-Controlled Timeline
This script controls timeline playback with mouse scrolling - perfect for scroll-based storytelling:
import { Behaviour, PlayableDirector, serializable, Mathf } from "@needle-tools/engine";

export class ScrollTimeline extends Behaviour {

    @serializable(PlayableDirector)
    timeline?: PlayableDirector;

    @serializable()
    sensitivity: number = .5;

    @serializable()
    clamp: boolean = false;

    private _targetTime: number = 0;

    awake() {
        this.context.domElement.addEventListener("wheel", this.onWheel);
        if (this.timeline) this.timeline.pause();
    }

    private onWheel = (e: WheelEvent) => {
        if (this.timeline) {
            this._targetTime = this.timeline.time + e.deltaY * 0.01 * this.sensitivity;
            if (this.clamp) this._targetTime = Mathf.clamp(this._targetTime, 0, this.timeline.duration);
        }
    }

    update(): void {
        if (!this.timeline) return;
        const time = Mathf.lerp(this.timeline.time, this._targetTime, this.context.time.deltaTime / .3);
        this.timeline.time = time;
        this.timeline.pause();
        this.timeline.evaluate();
    }
}
How it works:
- Listens for mouse wheel events
- Smoothly interpolates timeline position
- Optional clamping to timeline duration
- Adjustable sensitivity
Animation Tips & Best Practices
Performance:
- Use AnimatorController for characters with multiple states
- Use Animation component for simple one-off animations
- Use PlayableDirector for coordinated multi-object sequences
Organization:
- Name your animation clips clearly
- Group related animations in AnimatorController states
- Use consistent parameter names across AnimatorControllers
Optimization:
- Remove unused animation tracks before export
- Use lower frame rates for background animations
- Consider LOD (Level of Detail) for distant animated objects
Next Steps
- Play Animations - Cross-editor guide: triggering from UI, controlling from code, and building animations/timelines at runtime
- Components Overview - Learn about other interactive components
- Custom Components - Write code to trigger animations
- Deployment - Publish your animated scenes
Need Help?
- Discord Community - Ask questions about animation workflows
- Forum - Share your animated projects
- FAQ - Common animation issues