Enable Networking
Add multiplayer to your Needle Engine project in 5 minutes.
This guide shows you how to enable networking in your project and test it with synchronized objects across multiple browser windows.
Quick Start
Step 1: Add the SyncedRoom Component
Add a SyncedRoom component to your scene. By default, this will use networking infrastructure provided by Needle.
In Unity:
- Select a GameObject in your scene (or create a new empty GameObject)
- Add Component → Needle Engine → Networking → Synced Room
In Blender:
- Select an object in your scene
- Add Component → Networking → Synced Room
In Code (three.js/web):
import { SyncedRoom } from "@needle-tools/engine";

const syncedRoom = gameObject.addComponent(SyncedRoom);
Step 2: Add Synchronized Transform
Add a SyncedTransform component to an object whose movement you want to synchronize across the network.
In Unity:
- Select the GameObject you want to sync
- Add Component → Needle Engine → Networking → Synced Transform
In Blender:
- Select the object you want to sync
- Add Component → Networking → Synced Transform
Step 3: Make it Interactive
Add a DragControls component to the same object to make it draggable.
In Unity:
- Add Component → Needle Engine → Interaction → Drag Controls
In Blender:
- Add Component → Interaction → Drag Controls
Step 4: Test It!
- Run your project - Start the development server
- Open in browser - Navigate to your local development URL (usually
http://localhost:3000) - Join a room - Click the "Join Room" button that appears
- Copy the URL - The URL will update with a room ID
- Open another window - Paste the URL in a new browser window (or on another device)
- Drag the object - Try dragging the object in one window and watch it move in the other!
The DragControls component has built-in networking support. Ownership will be transferred to whoever starts dragging the object.
Built-In Components with Networking Support
| Component | Description |
|---|---|
SyncedRoom | Handles networking connection and connection to a room |
SyncedTransform | Synchronizes object transforms (position, rotation, scale) |
SyncedCamera | Spawns a prefab for each user showing their viewpoint |
VoIP | Voice-over-IP audio connections between users |
ScreenCapture | Screen sharing via web APIs |
Networking | Customize the server backend URL or use a local server |
DragControls | Drag objects with automatic ownership transfer |
Duplicatable | Duplicate objects across the network |
Deletable | Delete objects across the network |
DeleteBox | Delete objects when dragged into a volume |
PlayerSync | Instantiate an object for each connected player |
PlayerState | Component for objects instantiated by PlayerSync |
PlayerColor | Assign each user a random color |
WebXR | Synchronize VR/AR avatars (hands and heads) |
Configuration Options
Using a Custom Server
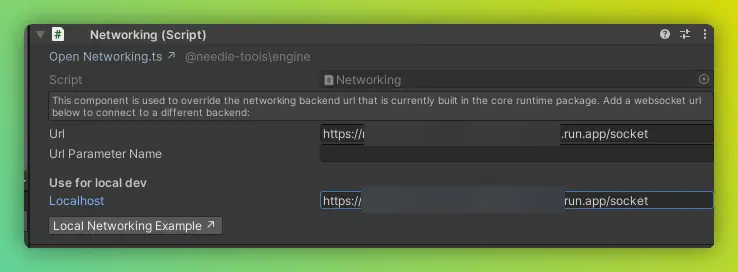
Add a Networking component to customize the server backend URL:
Production Server: Set the "Production" URL to your custom server endpoint.
Development Server: Set the "Localhost" URL to test with a local networking server.
Room Settings
The SyncedRoom component allows you to configure:
- Room Name - Custom room identifier (leave empty for auto-generated)
- Auto Join - Automatically join the room on load
- Require Interaction - User must click to join (required for audio/voice)
Debug Tools
Add these URL parameters to your page for debugging:
| Parameter | Description |
|---|---|
?debugnet | Log all network messages to console |
?debugowner | Log ownership requests and changes |
?debugnetbin | Log binary message details |
Example:
http://localhost:3000/?debugnetNext Steps
Learn more about networking:
- Sync Component State - Use
@syncFieldfor automatic networking - Manual Networking - Send and receive custom messages
- Understanding Networking - Learn how it works
Advanced:
- Host Your Own Server - Deploy custom networking infrastructure
- Networking Events API - Complete event reference