Deployment Platforms
Get your Needle Engine projects live on the web. Deploy to popular hosting platforms like Netlify, Vercel, GitHub Pages, and more.
Optimize Your Build First
Before deploying to production, optimize your project for best performance: Optimization & Compression →
Learn about texture compression (KTX2), mesh compression (Draco/Meshopt), progressive loading, and build types.
What does deployment mean?
Deployment is the process of making your application available to the public on a website. Needle Engine ensures that your project is as small and fast as possible by using the latest compression techniques such as KTX2, Draco, and Meshopt. Learn more about Optimization & Compression.
Quick Start: Choose Your Platform
Pick a hosting platform that fits your needs:
- Needle Cloud – Official Needle hosting. Great for all kinds of spatial web apps and 3D assets.
- Netlify – Professional hosting with custom domains and CI/CD.
- Vercel – Optimized platform for frontend developers with excellent performance.
- GitHub Pages – Free static hosting, great for open source projects.
- itch.io – Perfect for games and interactive experiences.
- Facebook Instant Games – Reach users on Facebook and Messenger.
- FTP Upload – Deploy directly to any server with FTP/SFTP support.
- Build to Folder – Upload manually to any web server or hosting service.
- Glitch (Deprecated) – Glitch has discontinued their hosting service.
Need Help?
Can't find what you're looking for? Let us know in our forum!
Deployment Options
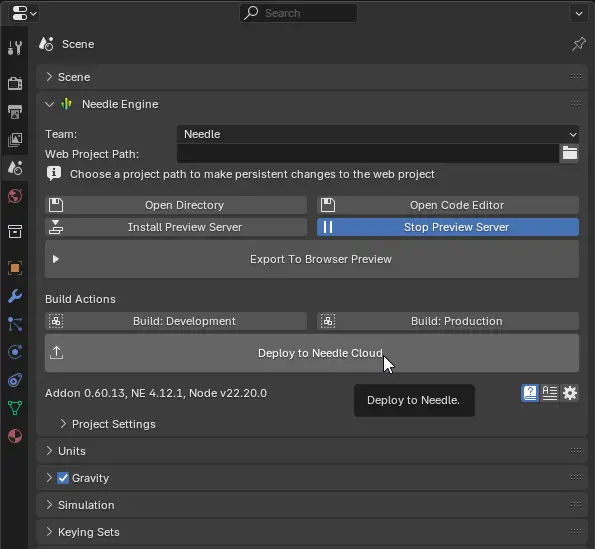
 Deploy to Needle Cloud
Official Needle hosting – The fastest way to get your Needle Engine projects online with built-in networking support.
Needle Cloud provides instant deployment, automatic HTTPS, and seamless integration with multiplayer and networking features.
Unity: Deploy to Needle Cloud
- Add the Needle Engine component to your scene (if not already present)
- Click Upload to Needle Cloud in the component inspector
- Sign in to your Needle Cloud account when prompted
- Choose your team and project name, then click Upload
Your project will be live at https://<your-project-name>.needle.run with automatic updates on every deployment.

Blender: Deploy to Needle Cloud
- Open the Needle Engine panel in your scene (if not already present)
- Sign in to your Needle Cloud account when prompted
- Then click Upload to Needle Cloud
Your project will be live at https://<your-blendfile-name>.needle.run with automatic updates on every deployment.
Note: The deployment url will by default be based on your blend file name.
Features:
- Instant deployment – Get your project online in seconds
- Built-in networking – Multiplayer and real-time features work out of the box
- Automatic HTTPS – Secure connections by default
- Version management – Keep track of all your deployments
- Custom domains – Use your own domain name (Pro plan)
Learn more: Needle Cloud Documentation
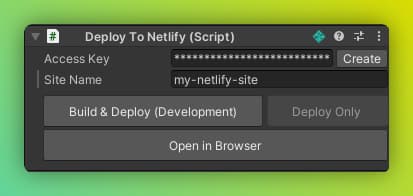
 Deploy to Netlify
Professional hosting with custom domains, automatic HTTPS, and continuous deployment.
Unity: Deploy to Netlify
Add the DeployToNetlify component to your scene and follow the instructions. You can create new projects or deploy to existing ones with a single click.

 Deploy to Vercel
Optimized platform for frontend developers with excellent performance and DX.
Setup:
- Create a new project on Vercel
- Add your web project to a GitHub repository
- Connect the repository to your Vercel project
See our Next.js sample project for configuration reference.
 Deploy to itch.io
Perfect for games and interactive experiences with a built-in community.
Unity: Deploy to itch.io step-by-step
Create a new project on itch.io
Set Kind of project to HTML

Add the
DeployToItchcomponent to your scene and click Build
Wait for the build to finish. It will open a folder with the final zip
Upload the final zip to itch.io

Select This file will be played in the browser

Save your itch page and view the project page Your Needle Engine project should now load! 😊
Optional settings:

Troubleshooting: Failed to find index.html

If you see this error, make sure you're not uploading a gzipped index.html.
Fix: Disable gzip compression in vite.config.js in your Needle web project folder. Remove the line with viteCompression({ deleteOriginFile: true }), rebuild, and upload to itch.
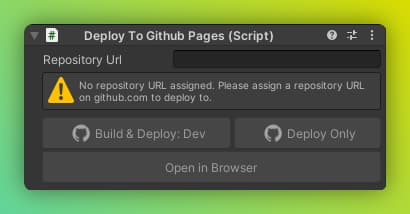
 Deploy to GitHub Pages
Free static hosting, perfect for open source projects and documentation.
Unity: Deploy to GitHub Pages
Add the DeployToGithubPages component to your scene and copy-paste your GitHub repository URL or GitHub Pages URL.
Troubleshooting GitHub Pages
Deployed but website is not live:
- First deployment can take a few minutes. Check the Actions tab on GitHub (
/actions) to see deployment progress. - If not live after a few minutes or no workflow appears in Actions, go to Settings → Pages (
/settings/pages) and ensure Branch is set togh-pages.
 Deploy to Facebook Instant Games
Reach users on Facebook and Facebook Messenger with instant-loading games.
No manual adjustments required – Needle Engine handles everything automatically.
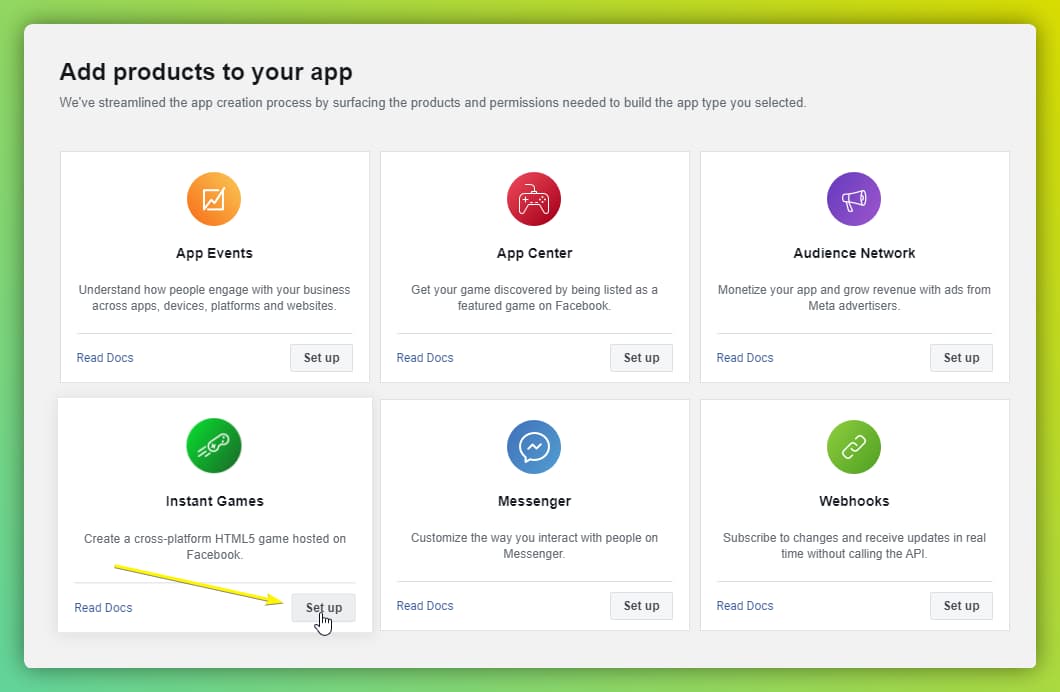
Unity: Deploy to Facebook Instant Games
Add the
Deploy To Facebook Instant Gamescomponent to your scene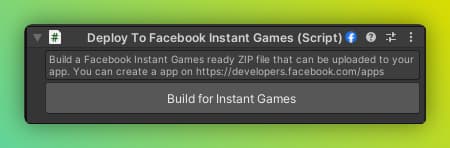
Click Build For Instant Games
After the build finishes, you'll get a ZIP file to upload to your Facebook app
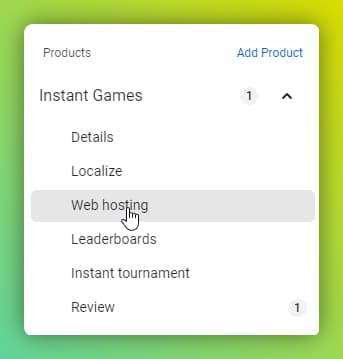
On Facebook, add the Instant Games module and go to Instant Games → Web Hosting
Upload your zip using Upload version (1). After processing, click Stage for testing (2) or Push to production (star icon)
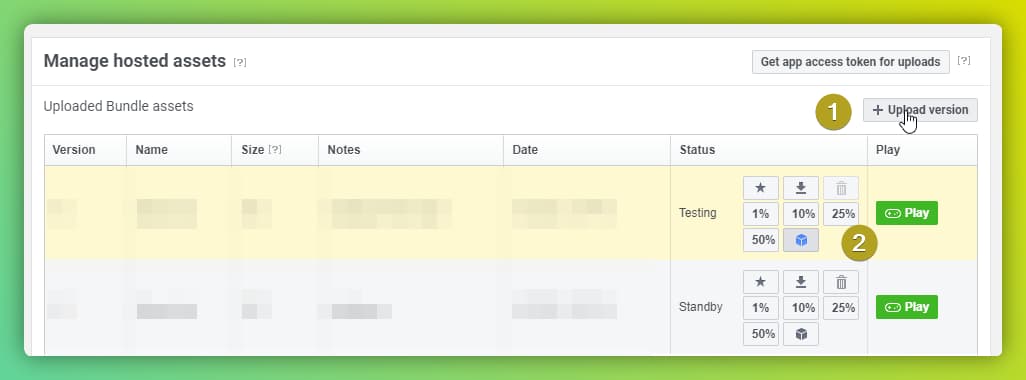
Click the Play button next to each version to test your game on Facebook
How to create a Facebook app with Instant Games
Create a new app and select Other, then click Next
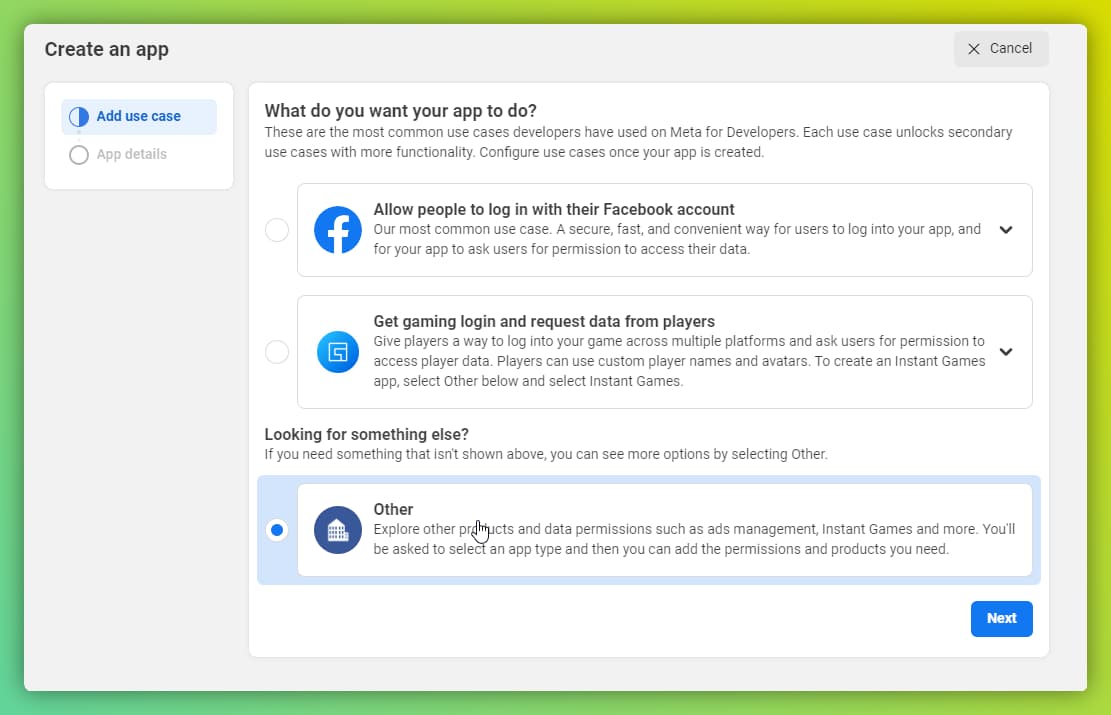
Select type Instant Games

After creating the app, add the Instant Games product
See the official Instant Games documentation for more details.
Note: You only need to create the app – Needle Engine handles all technical requirements automatically.
Deploy to Glitch 🎏
Deprecated - Service Discontinued
Glitch has discontinued their hosting service. This deployment option is no longer available.
Alternatives:
- Needle Cloud – Official Needle hosting with built-in networking support
- Netlify – Professional hosting with custom domains
- Vercel – Excellent performance for frontend projects
- Build to Folder – Deploy to any web server manually
 Deploy to FTP
Deploy directly to any server with FTP or SFTP support.
Unity: Deploy to FTP server
Add the
DeployToFTPcomponent to a GameObject in your scene (Best practice: add it to the same GameObject as Needle Engine)Assign an FTP server asset and fill in server, username, and password Get these credentials from your hosting provider when you create an FTP account
Click Build & Deploy to build and upload to your FTP account

Deploy to FTP component
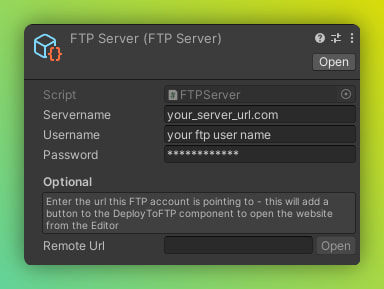
FTP Server asset containing access information
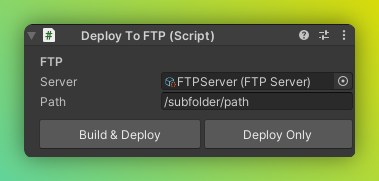
Deploy To FTP component with server asset assigned. You can deploy to a subfolder using the path field
Manual FTP deployment
- Open File → Build Settings, select Needle Engine, and click Build
- Wait for the build to complete – the
distfolder will open automatically - Copy the files from the
distfolder to your FTP storage
That's it! 😉

Troubleshooting:
Website doesn't work after upload: Your web server may not support serving gzipped files.
Option 1: Enable gzip compression on your server using a .htaccess file (see below) Option 2: Turn off gzip compression in build settings at File → Needle Engine → Build Window

Build errors during compression: Please report the bug! To get unstuck immediately, toggle Development Build on in Build Settings.
Enabling gzip using a htaccess file
Create a file named .htaccess in your upload folder (or parent folder) with this content:
<IfModule mod_mime.c>
RemoveType .gz
AddEncoding gzip .gz
AddType application/javascript .js.gz
Upload the .htaccess file to your server.
 Build To Folder
Build your project locally for manual upload to any web server or hosting service.
When using our default Vite template, the build output folder is <webproject>/dist.
![]() Unity: Access Build Options
Unity: Access Build Options
Open File → Needle Engine → Build Window:
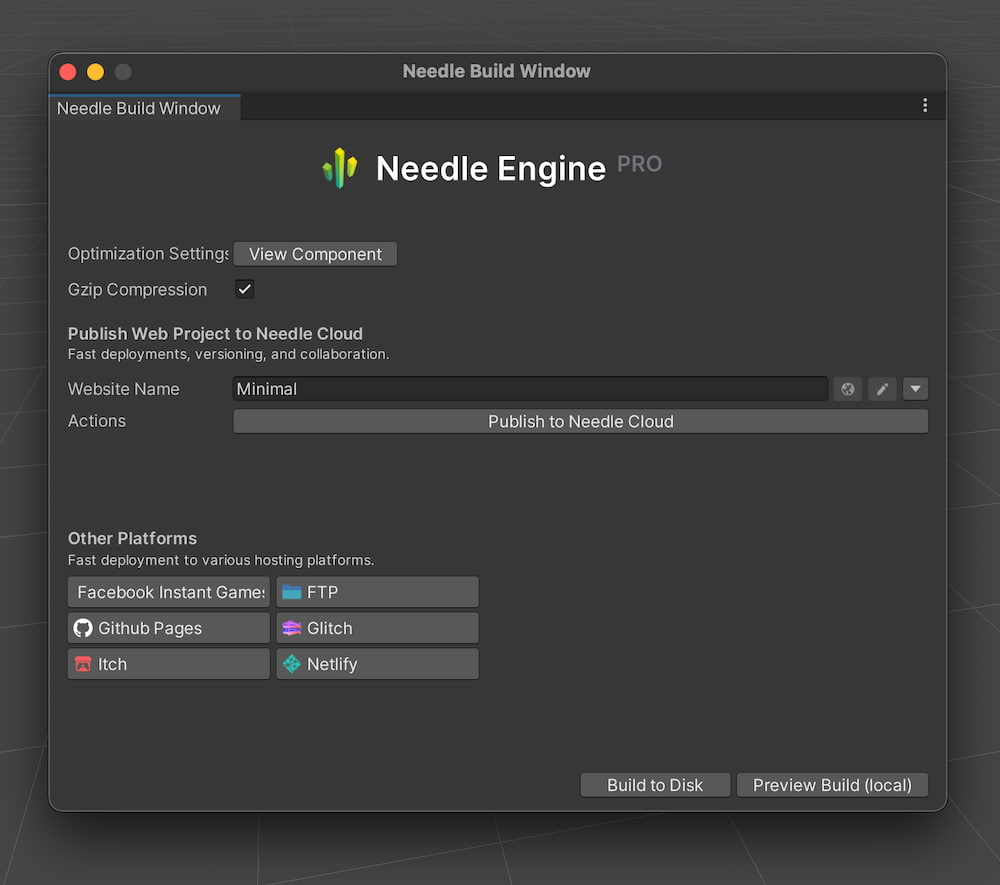
Available Options:
- Build to Disk – Create production build in the
distfolder - Preview Build – Build and start a local server to preview the final result
- Development Build – Disable compression for debugging (not recommended for production)
Learn more: Optimization & Compression - Build types, compression options, and best practices
Node.js is only required during development
The distributed website (using our default Vite template) is a static page that doesn't rely on Node.js and can be hosted on any regular web server.
Node.js is only required if you want to run our minimalistic networking server for multiplayer experiences.
Advanced Topics
Cross-Platform Deployment Workflows
You can create Unity projects that build to both Needle Engine and regular Unity platforms (Desktop, WebGL, etc.). Our component mapping approach means no runtime logic is modified in Unity.
Using Unity Play Mode:
In Project Settings → Needle Engine, toggle Override Play Mode and Override Build Settings to switch between Needle's build process and Unity's build process:

Dual Platform Development
This approach may require duplicate code (C# for Unity, TypeScript for Needle Engine). The amount of extra work depends on your project complexity.
Needle Engine Command Line Arguments for Unity
Needle Engine for Unity supports command-line arguments for batch exports and builds using -batchmode (headless/CLI options).
Note: A Needle Engine PRO license is required for command-line builds.
Available Options:
| Argument | Description |
|---|---|
-executeMethod Needle.Engine.ActionsBatch.Execute | required — Tells Needle Engine to run batch processing |
-teamId <teamId> | required — Your Needle Cloud team id. Get via Needle Cloud |
-scene | required — Path to a scene or asset to export Example: Assets/path/to/myObject.prefab or Assets/path/to/myScene.unity |
-outputPath <path> | required — Set the output path for the build Example: -outputPath path/to/output.glb |
-buildProduction | optional — Run a production build. Only used for Unity scenes. Either -buildProduction or -buildDevelopment must be specified. |
-buildDevelopment | optional — Run a development build. Only used for Unity scenes. Either -buildProduction or -buildDevelopment must be specified. |
-debug | Open a console window for debugging |
Please refer to the Unity Commandline Arguments documentation for Unity specific options.
Needle License Server
For automated builds on CI/CD systems make sure the Needle License server is running. See Needle Cloud Documentation - Starting the License Server for setup instructions.
Example Usage:
Unity.exe -batchmode -executeMethod Needle.Engine.ActionsBatch.Execute -teamId <teamId> -projectPath "C:/MyProject" -scene "Assets/Scenes/MyScene.unity" -buildProduction -quitNext Steps
Optimize Your Build:
- Optimization & Compression – Make your project load faster and run smoother
- Export Guide – Best practices for 3D assets
Learn More:
- Getting Started Guide – Set up your first project
- Needle Cloud Documentation – Official hosting platform
- Features Overview – See what's possible
Get Help:
- Forum – Ask questions and share projects
- Discord – Join the community
- Help & Community – Additional resources